Have you ever felt that software seems to have a mind of its own, is sometimes stubborn, and works a bit against you? Unfortunately, this behaviour happens – and can lead to losing intermediate steps of our work, or even losing the entire results that we have computed so far.
To prevent this situation from happening we need to set up mechanisms that store the data properly, that let us go back to a previous step in our work process, and also let us compare differences between individual steps. The way to achieve this is to combine reliable hardware equipped with a file system like Ext3/Ext4, BTRFS or ZFS/OpenZFS, with a revision control system like Git on top, and a compatible remote backup service such as BackHub on GitHub Marketplace.
Let us assume that the issues of the file system and the remote backup service are answered. What’s left to consider is the revision control system in which we keep our data. An experienced user with technical background knows how to work with Git, how to commit the data, and how to see and revert the changes. In contrast, a less experienced user without technical background may concentrate on the individual project steps or the results themselves, and may have never have even heard the term revision or version control system. His greatest fear is losing the work on which he spent lots of time and energy, or the research results – whether by accident, software errors, or a malicious act.
The task of a system administrator for a work/research group is to set up and to maintain a reliable working environment, and to provide technology that supports the work/research group. The question still remains as to how to set up a mechanism that automatically saves file changes – either as soon as a change of file content is noticed (data is written to storage), or periodically, such as every ten minutes. Furthermore, no interaction of the end user should be required. It must be possible to run the service as a background job without any user attention required.
Technically, there are a few options available. For example:
- to combine a Host-based Intrusion Detection System (HIDS) like Audit [1] or Integrit [2] with cron,
- to directly use the Inotify kernel interface [3] in order to see changes on the filesystem by running tools like Inotifywait, incron, or fswatch [4],
- to write and run a shell script based on find, xargs, and git, or
- to work with a tool like gitwatch [5] or Flashbake [6] in order to automatically register changes in a revision control system
See [7,8,9] for more details about the other solutions and tools mentioned above. The tool etckeeper [10] is not part of the list because it is meant to solely focus on configuration files.
Let’s now examine gitwatch, since it provides a more general solution.
Introducing Gitwatch
Gitwatch describes itself as “[a] Bash script to watch a file or folder and commit changes to a git repo”. It is released under GPLv3, and uses the Inotify kernel subsystem in order to see content changes written to storage.
Prior to using Gitwatch make sure that the corresponding inotify software package is installed on your system – for Debian GNU/Linux the package is named ‘inotify-tools’ [11], and available for the Debian releases Jessie, Stretch, and Buster.
Gitwatch also requires that the data to be versioned is held in a local Git repository in which it can store observed changes to files. See the according Git commands to setup a Git repository [12].
At this time, gitwatch has not yet been packaged for Debian or Ubuntu. The software is available from Github, and does not require any compilation to use. Therefore, the initial step is retrieval of the script from the project website on Github (see listing 1):
Listing 1: Cloning the Gitwatch archive from Github
$ git clone https://github.com/gitwatch/gitwatch.git
The package contains the bash script gitwatch.sh as well as the file gitwatch.service to set up an appropriate service for systemd. The remaining files are of no big interest to end-users; besides a machine-readable package description in the JSON format there are a number of tests scripts included. To use Gitwatch as a regular user it suffices to simply call the script gitwatch.sh from the command line (see the listings 3 and 4 below).
In order to make the script available system-wide, run the following command as a prior step from inside the retrieved git archive:
Listing 2: Installing Gitwatch from the sources
# install -b gitwatch.sh /usr/local/bin/gitwatch
As an administrative action, the command install copies the file gitwatch.sh</code>to the directory <code>/usr/local/bin. Using the switch -b` (short for --backup`) a potentially existing file with exactly the same name is automatically archived. Thereafter, the command gitwatchis available system-wide, and can be run by regular users as well.
Tracking changes with Gitwatch
You can use Gitwatch in two ways – to observe either a single file, or an entire directory. Listing 3 shows how to take care of a single file that resides inside a Git repository. The & at the end of the command is required, and sends the Gitwatch process to the background.
Listing 3: Taking care of a file
$ gitwatch.sh dataset1 &
As soon as you have saved changes in the referred file dataset1 Gitwatch is notified about it, and it commits the changes to your local Git repository. Luckily, tracking an entire directory works in the same way.
To take care of the current directory the command is as follows.
Listing 4: Taking care of the current directory
$ gitwatch.sh . &
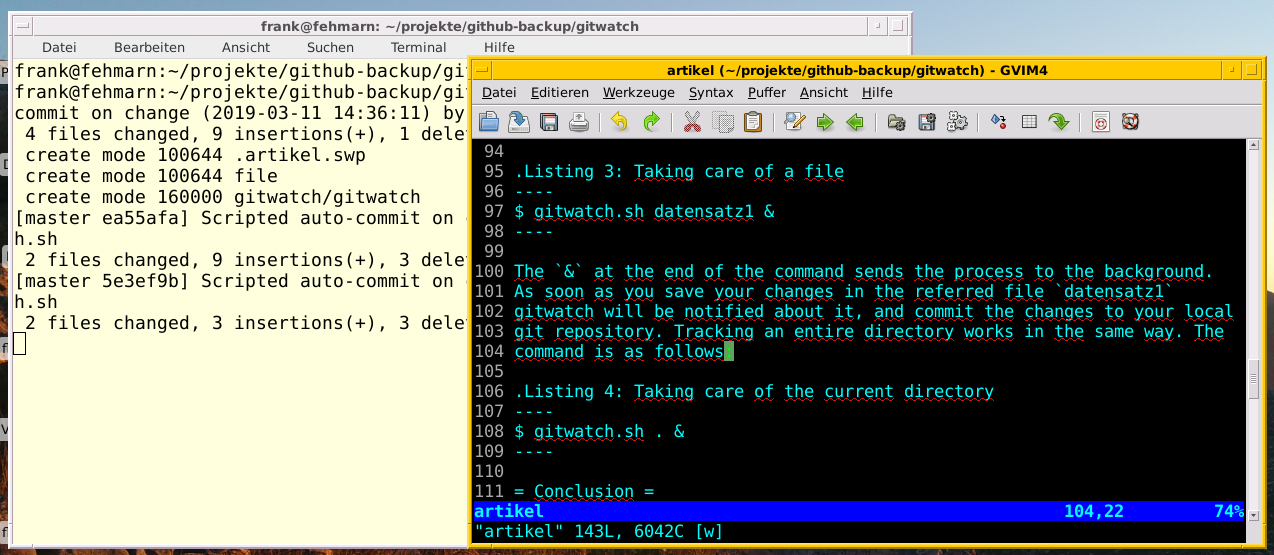
Figure 1 shows the output of Gitwatch that runs in the background while I am writing this article. The commit messages from Git are sent to stdout as soon as the content of a file changes, or when a file is added, deleted, or moved to a different place.
Figure 1: Using Gitwatch while preparing this article

Adjusting Gitwatch
Gitwatch comes with a number of useful switches:
-s sec:: amount of time to wait for a commit after a change was noticed. Value in seconds. The default value is two seconds.
-d format:: the format string used for the timestamp in the commit. The default value is +%Y-%m-%d %H:%M:%S. See the manual page of the UNIX/Linux date command for other formats [13,14].
-r name:: name of a remote directory the content is pushed to. The default value is ‘no push’. Deposit your SSH keys to prevent being asked for your password every time you do a push.
-b branchname:: the name of the branch. The default value is ‘no branch’, and refers to the current one.
-g path:: the path to the .git directory. If not specified any further, the local directory is used.
-l lines:: the number of lines being logged. The default value is set to 0, and means ‘no limit’.
-L lines:: the same as -l but without coloured formatting.
-m message:: the commit message. The default message is: “Scripted auto-commit on change (%d) by gitwatch.sh”. “%d” refers to the date (see above).
-e events:: specifies the events to be watched. This includes ‘close_write’, ‘move’. ‘delete’, and ‘create’ for closing, moving, deleting, and creating files. ‘events’ contains a comma-separated list of these values, and the default case consists of all four events.
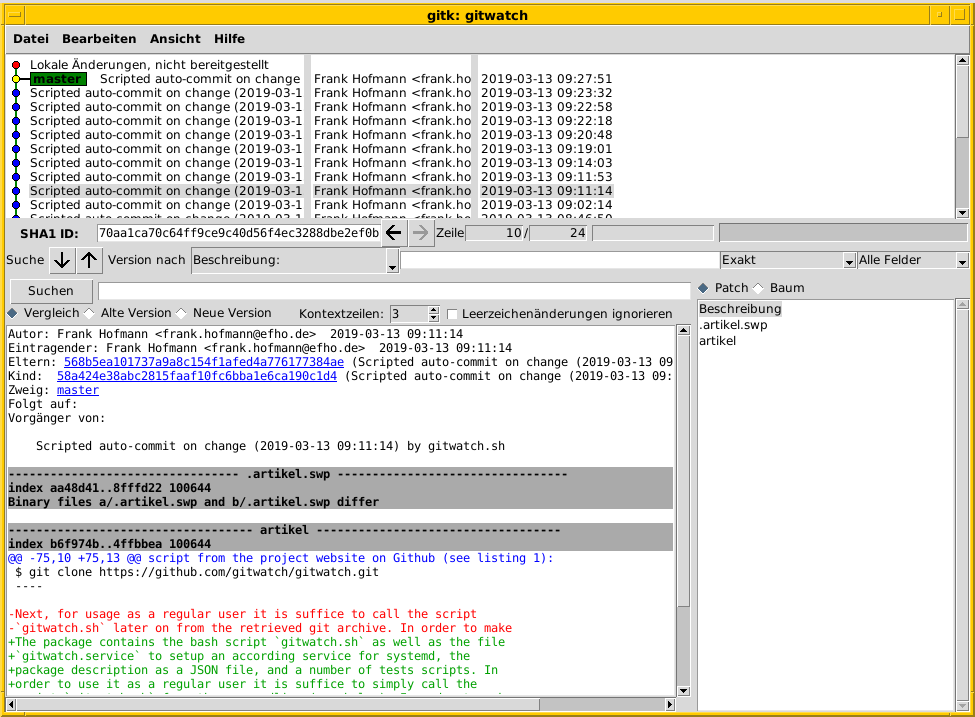
Figure 2 shows Gitk [15] – a graphical tool to inspect the changes of the local Git repository. The commit messages are similar, and the only difference between them is the logging date. As stated above, you an change the commit message using the switch -m.
Figure 2: Gitk shows the automatically generated commits

Excluding unwanted files
The default behaviour of Git covers all the files from your directory. Many programs create temporary files, for example Vim, which uses filenames that end with .swp. Usually, it does not make sense to record them. In order to exclude such files add the .gitignore file to your Git repository:
Listing 5: An example .gitignore file
*.swp
Caveats
Be aware that Gitwatch may not be the right tool for programmers. Programmers typically want to commit only code that works, i.e.,compiles and runs properly, and hence needs to be tested before committing.
Git commit hooks might help in this case to abort an automatic commit if the code doesn’t compile or if it fails the test suite, but this scenario is more involved, and therefore outside the scope of this article.
Gitwatch is configured with a delay of two seconds to wait for a commit. This works well for SSDs and smaller files. For conventional storage media and distributed file systems this value might be a bit too small. Changing large files may lead to the same effect, and therefore we recommend increasing the value. These cases need further experimentation in order to give correct advice on which delay works best.
Conclusion
Gitwatch is quite useful to automatically keep track of changes in your repository. It works well for pure data files, preferably plain text documents and configuration files. In order to effectively store binary data, as well as entire operating systems, the two Git extensions git-annex [16] and git-lfs [17] are quite useful.
Gitwatch helps by providing notification as soon as a change happens – whether planned, accidental, or malicious. This mechanism allows you to see what has changed and the exact time of the change, as well as to initiate a rollback. You can use gitwatch to set up your own document platform combined with a revision control system.
References
- [1] Audit
- [2] Integrit
- [3] Inotify, Wikipedia
- [4] fswatch
- [5] Gitwatch
- [6] Flashbake
- [7] Frank Hofmann: Monitoring Data Changes Using a HIDS
- [8] Frank Hofmann: Automating Version Control Commits
- [9] Frank Hofmann: Erbsenzählerei. Datenbestände auf Veränderungen oder Manipulationen prüfen, LinuxUser 09/2016
- [10] etckeeper
- [11] Debian package inotify-tools
- [12] Git cheat sheet
- [13] Linux date command, manpage
- [14] Linux date command
- [15] Gitk
- [16] git-annex
- [17] git-lfs
Acknowledgements
The author would like to thank Axel Beckert, Veit Schiele, Gerold Rupprecht, and Zoleka Hofmann for their help and critical remarks while preparing this article.

 Frank Hofmann">


