At some point after launching your app on the Shopify app store, you and every app developer will try to make sense of the traffic to your app listing. Is the Facebook campaign you’re testing out bringing merchants to your page? What about the handful of blog posts you’ve written over the past few months?
Trying to answer these questions is a great first step to better understand your marketing efforts and help inform where you should spend more time, or when it’s time to move on to something else. For these reasons and more, setting up Google Analytics on your app listing is a must (and it’s super easy to do).
But how about getting insights on what marketing channels are actually driving merchants to click on your [Add app] button? That’s way better. And for a long time, we didn’t have this configured properly for either of our Shopify Apps: Rewind Backups and Rewind Staging.
Google Analytics Setup
Before you can begin tracking the source of installs on your Shopify app listing, you need to track traffic and page views with Google Analytics (GA). If you’ve already connected your GA account to your app listing, jump ahead.
If you haven’t already connected GA to your Shopify app listing, this section is for you – and so is this article: How to set up Google Analytics for your Shopify app listing.
If you have GA on your website, you should create a separate property for your app listing.
Your app listing sits on a different domain, and by keeping it in a separate GA property, you will get a clearer view of what visitors do within the different areas under your online umbrella. You can take a look at some example account structures to get a better understanding of how to set up your GA properties.
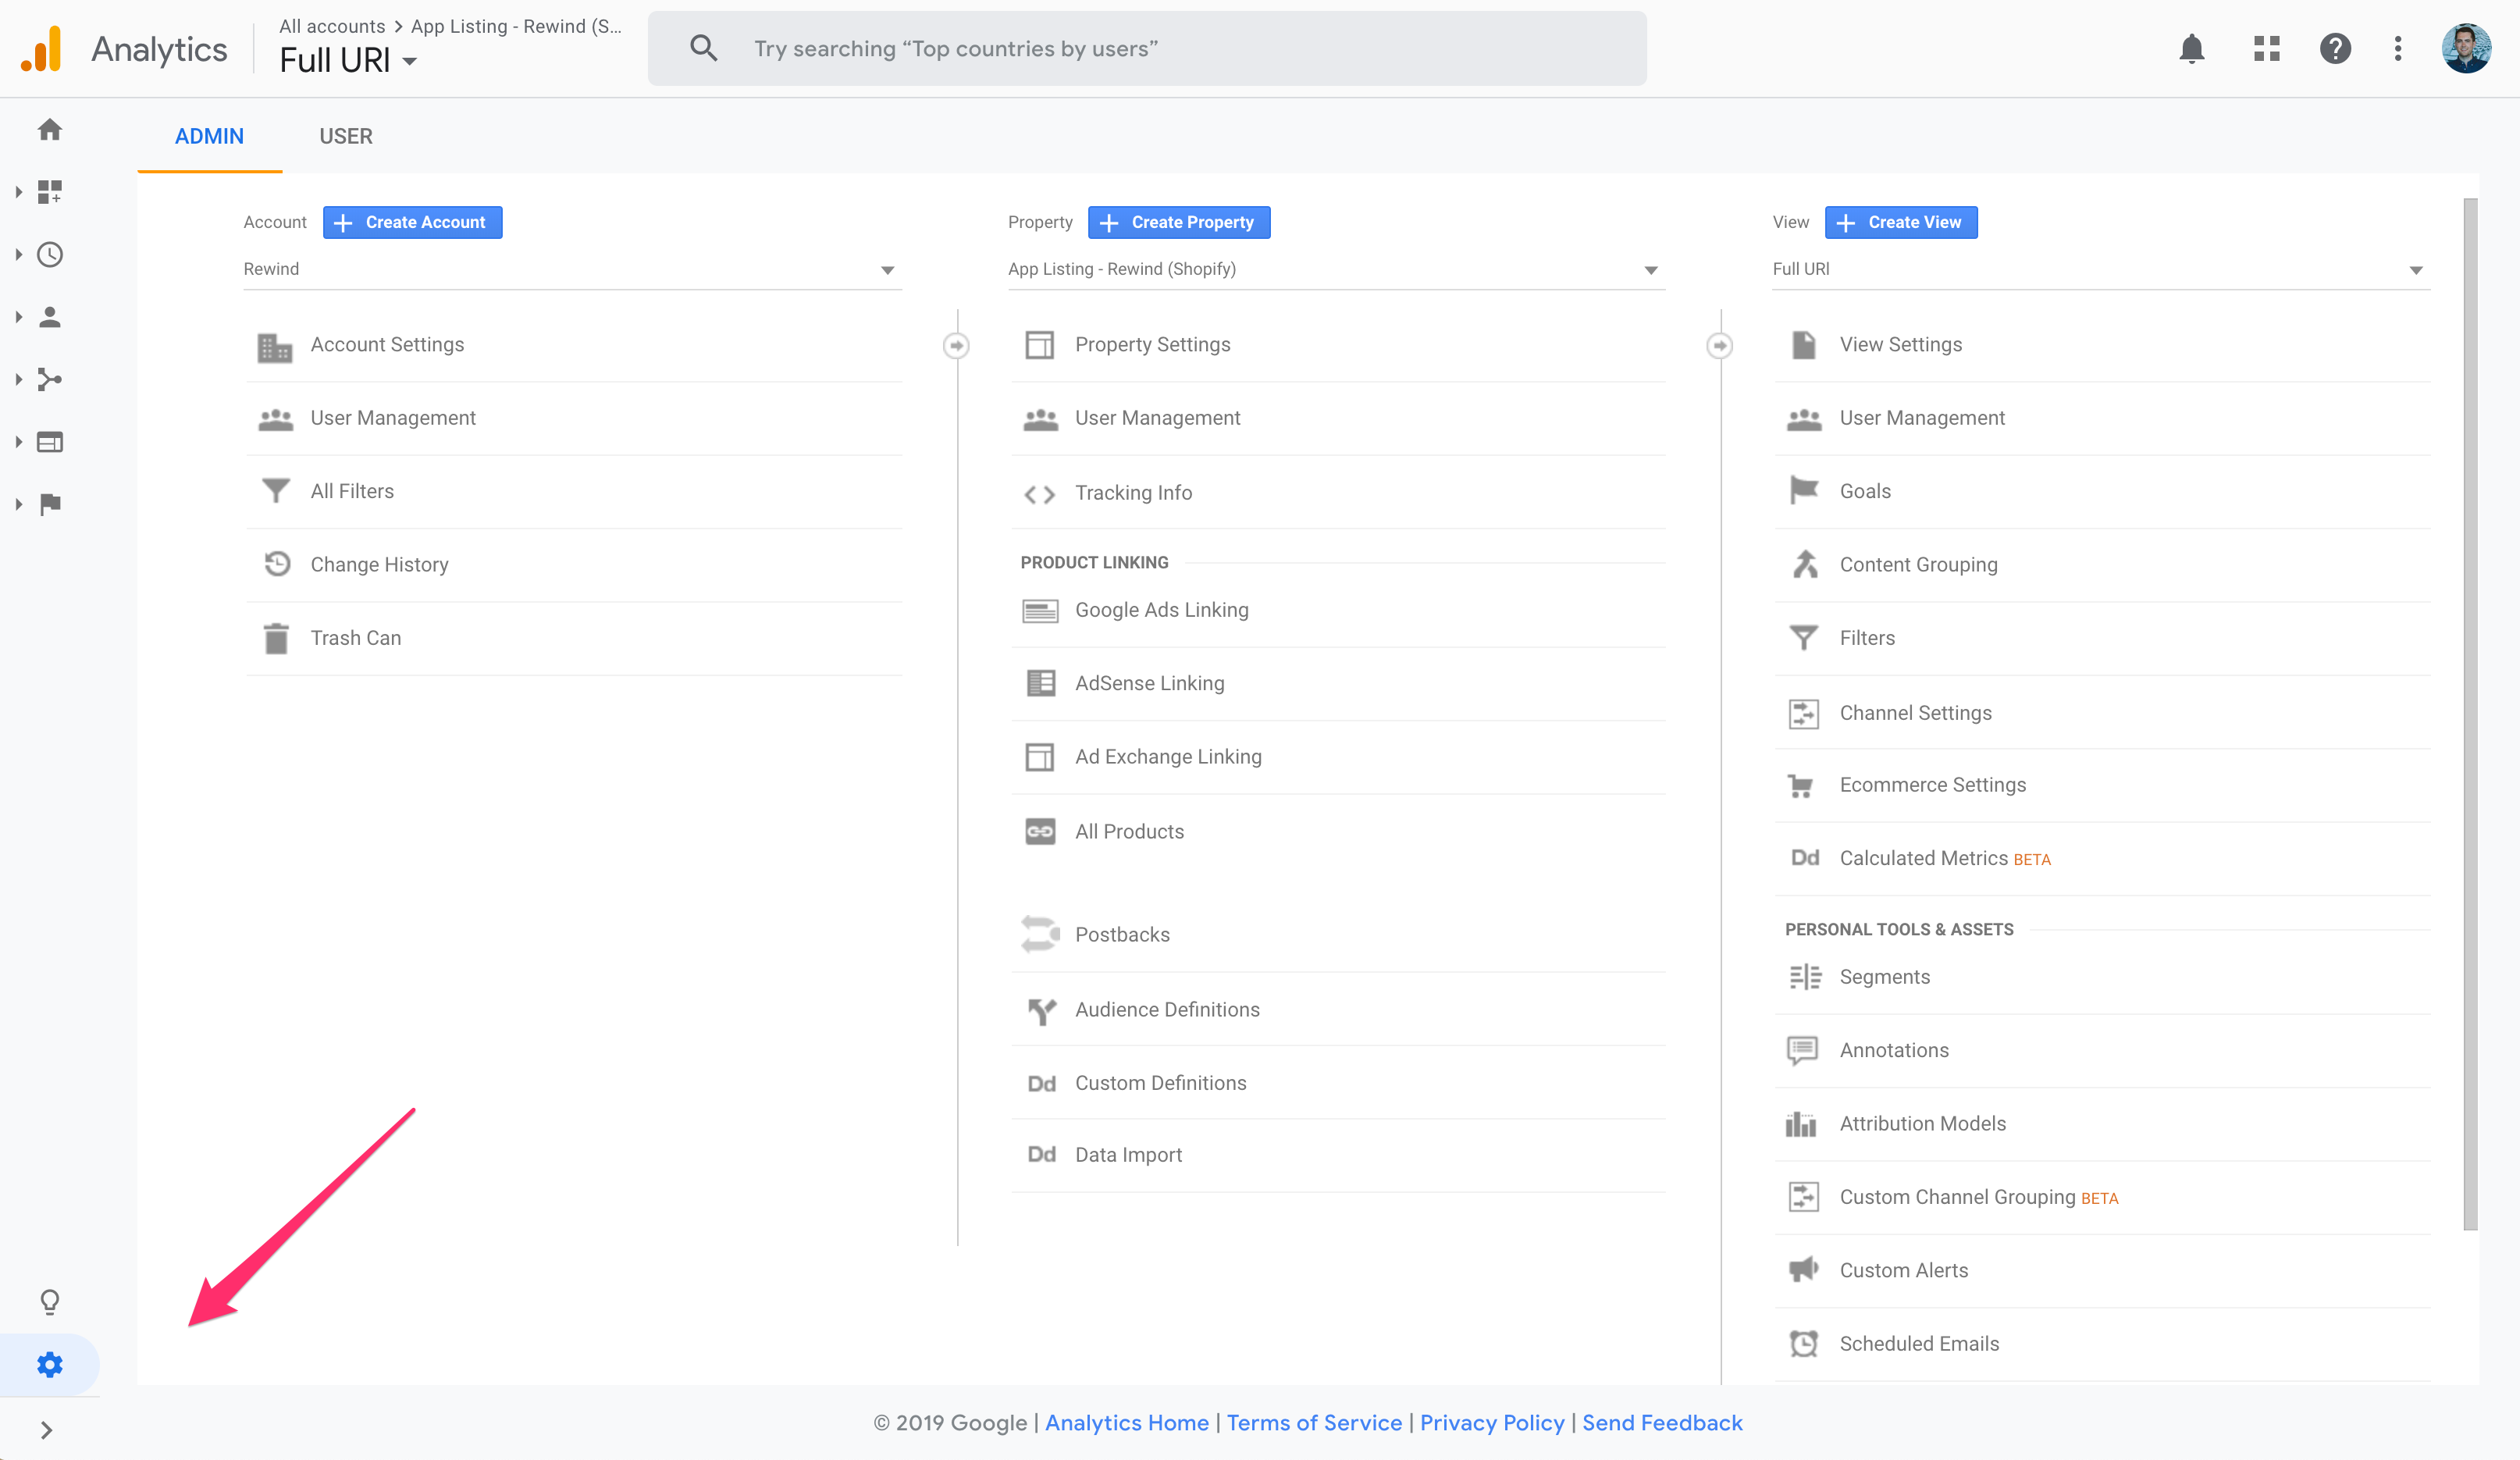
To create a new property, log in to your GA account and click the gear icon in the bottom left of the screen to load up the admin panel. Above the Property column in the middle, you will see a blue button to [+ Create Property].
Because Rewind is available for more platforms than just Shopify, (including BigCommerce backups and QuickBooks Online backups), we have several GA properties in our GA account.
When you create a new property, it will be assigned a new tracking ID that is slightly different than the ID of your account. For example, the Rewind website ID is something like 18988-1, while the Rewind Shopify app listing is 18988-5 because it’s the 5th property in our account.
Whatever setup you end up choosing for your Shopify app listing, head to your GA admin page, click on “<> Tracking Info” in the middle column, and then the “Tracking Code” option from the drop-down to get your specific GA Tracking ID. Copy it or write it down.
Adding Google Analytics to your Shopify App Listing
This part is really easy. With your GA Tracking ID in hand, head over to your Shopify Partners dashboard and click through to edit your app listing.
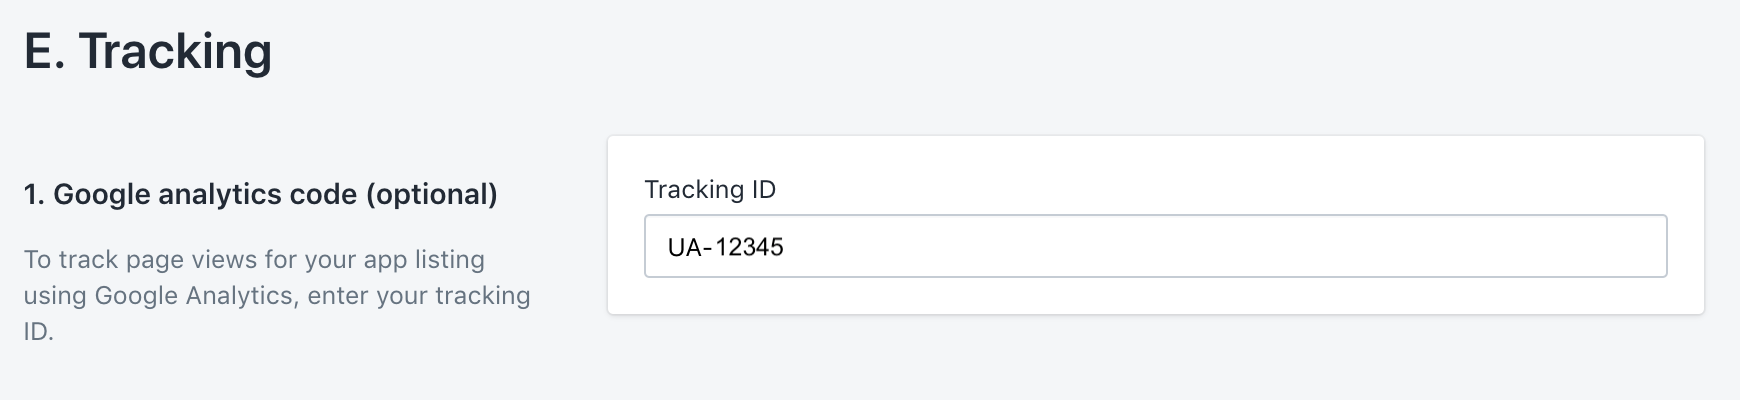
Scroll down to section E and paste your GA ID in the first box, labeled “Tracking ID”:
Great success! Within 24 hours (probably faster), you’ll start to see visitor information populate within your Google Analytics dashboard. 🎉
Tracking [Add App] Clicks
With Google Analytics up and running on your app listing, you’re on to the next step – one that I’ve found many app developers haven’t taken.
Shopify actually inserts an event for clicks on the [Add app] button in your app listing, and your GA account can read that event.
Check it out below – I used Google Chrome to right-click the button on one of our app listings and hit ‘Inspect.’ Do the same, and you’ll see the following for your app:
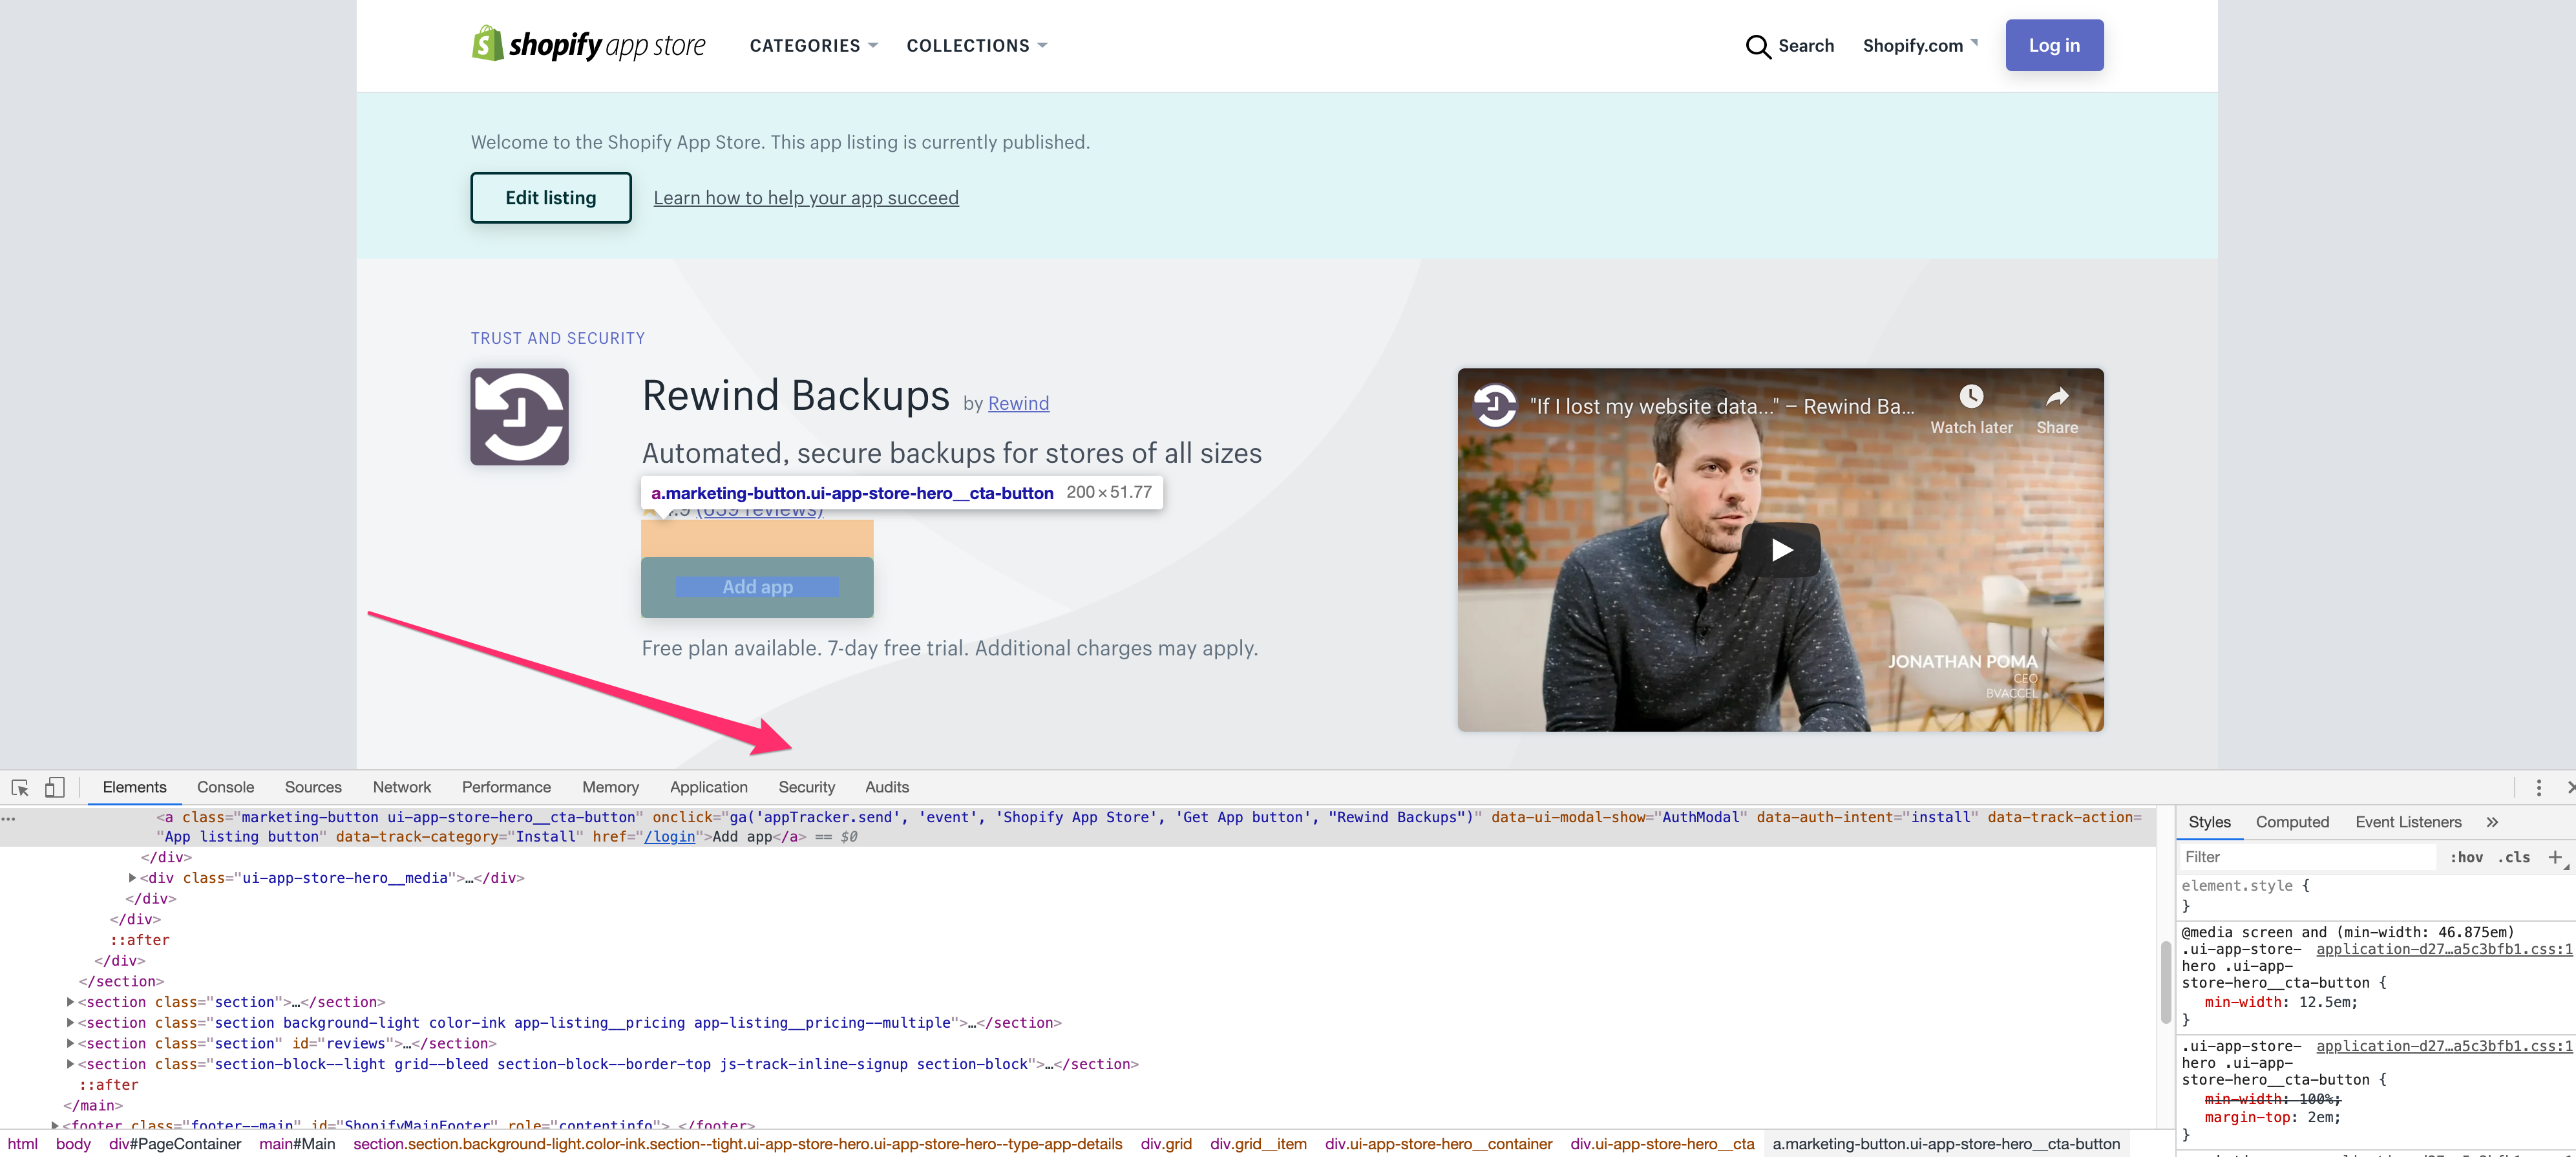
You’ll want to pay particular attention to what’s listed in the code after “event,” specifically: “Shopify App Store,” “Get App button,” and “AppName,” where AppName is your app. Write this down.
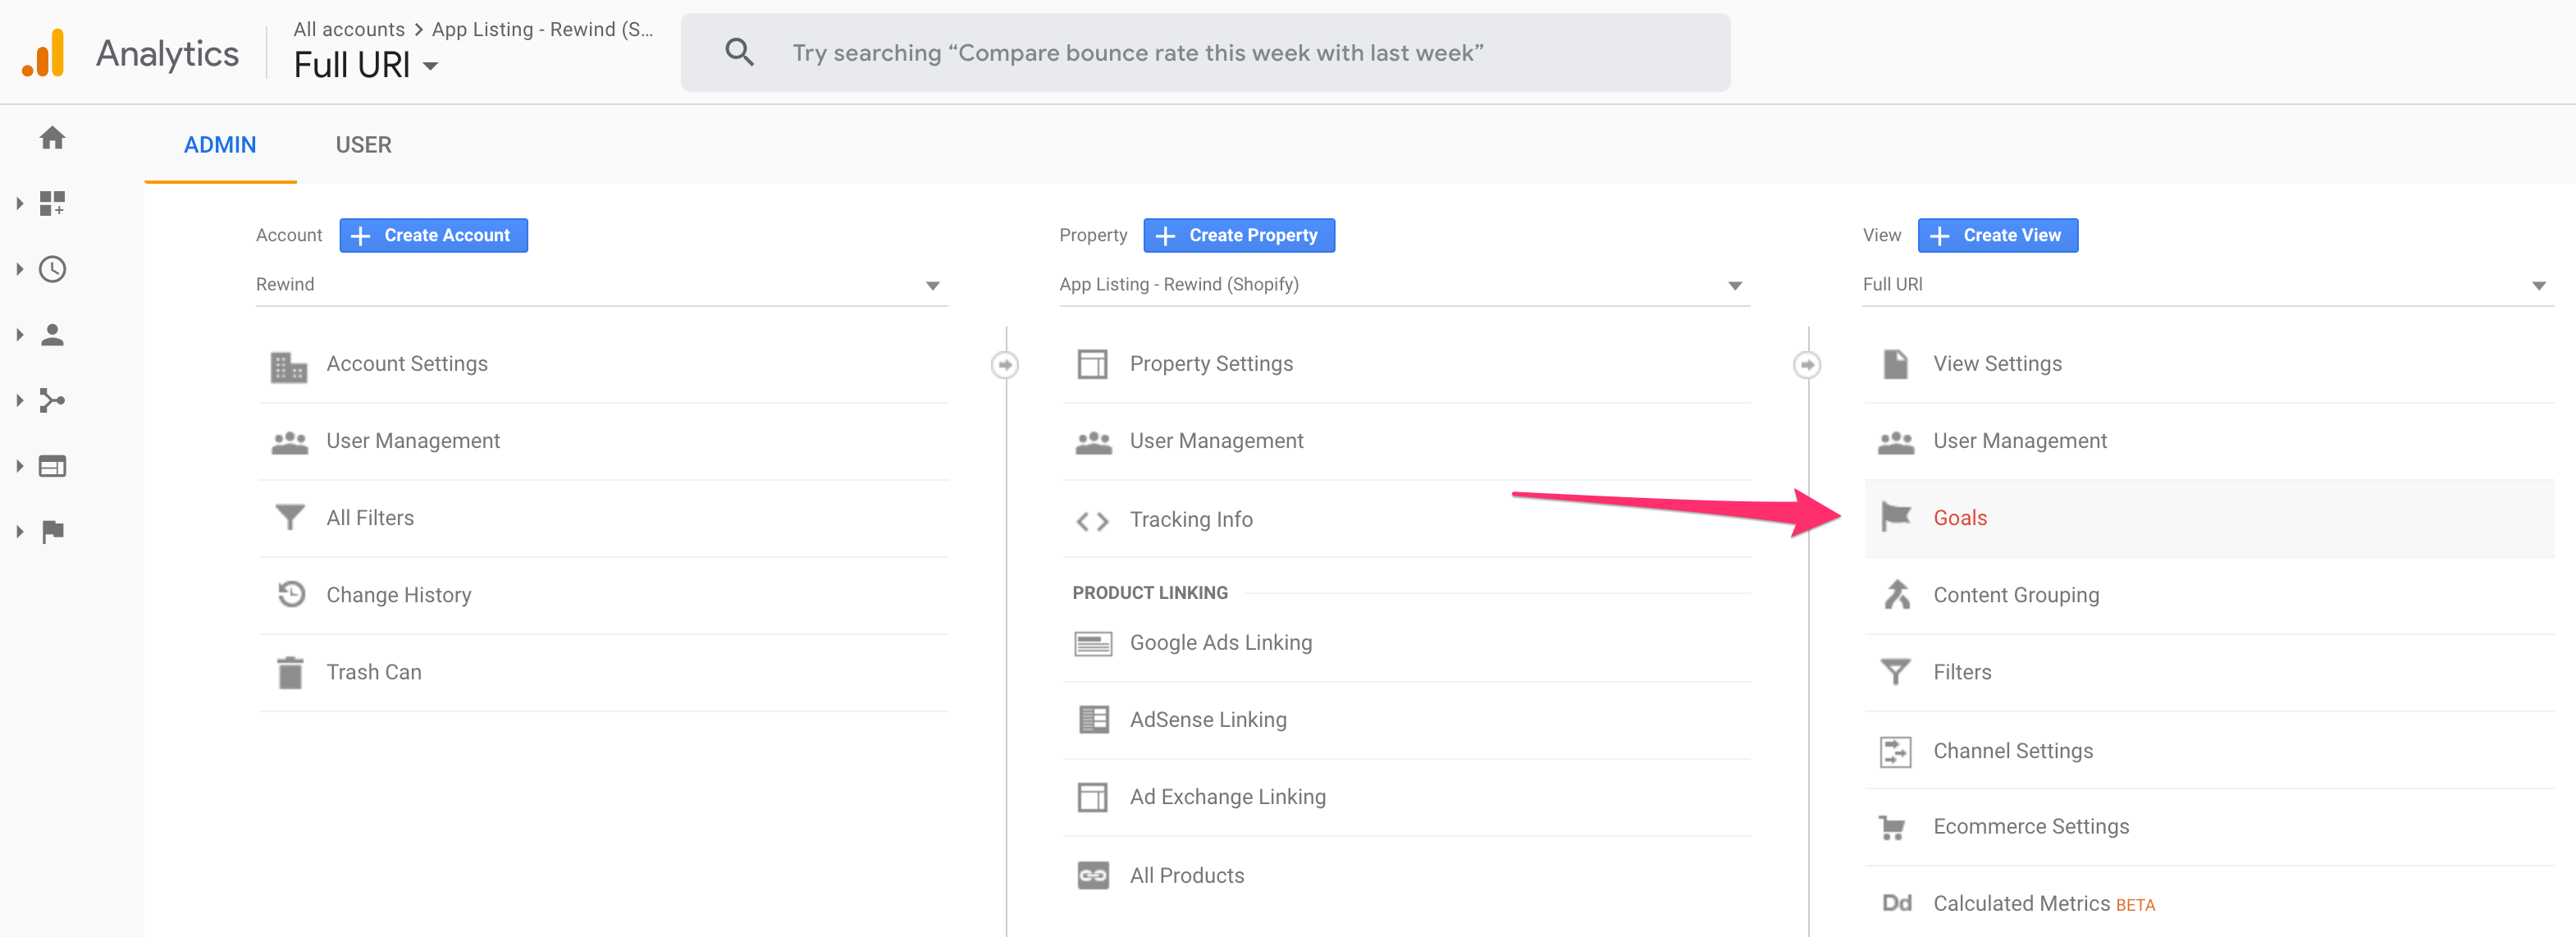
Head back to your GA admin panel and click on “Goals” in the View column on the right.
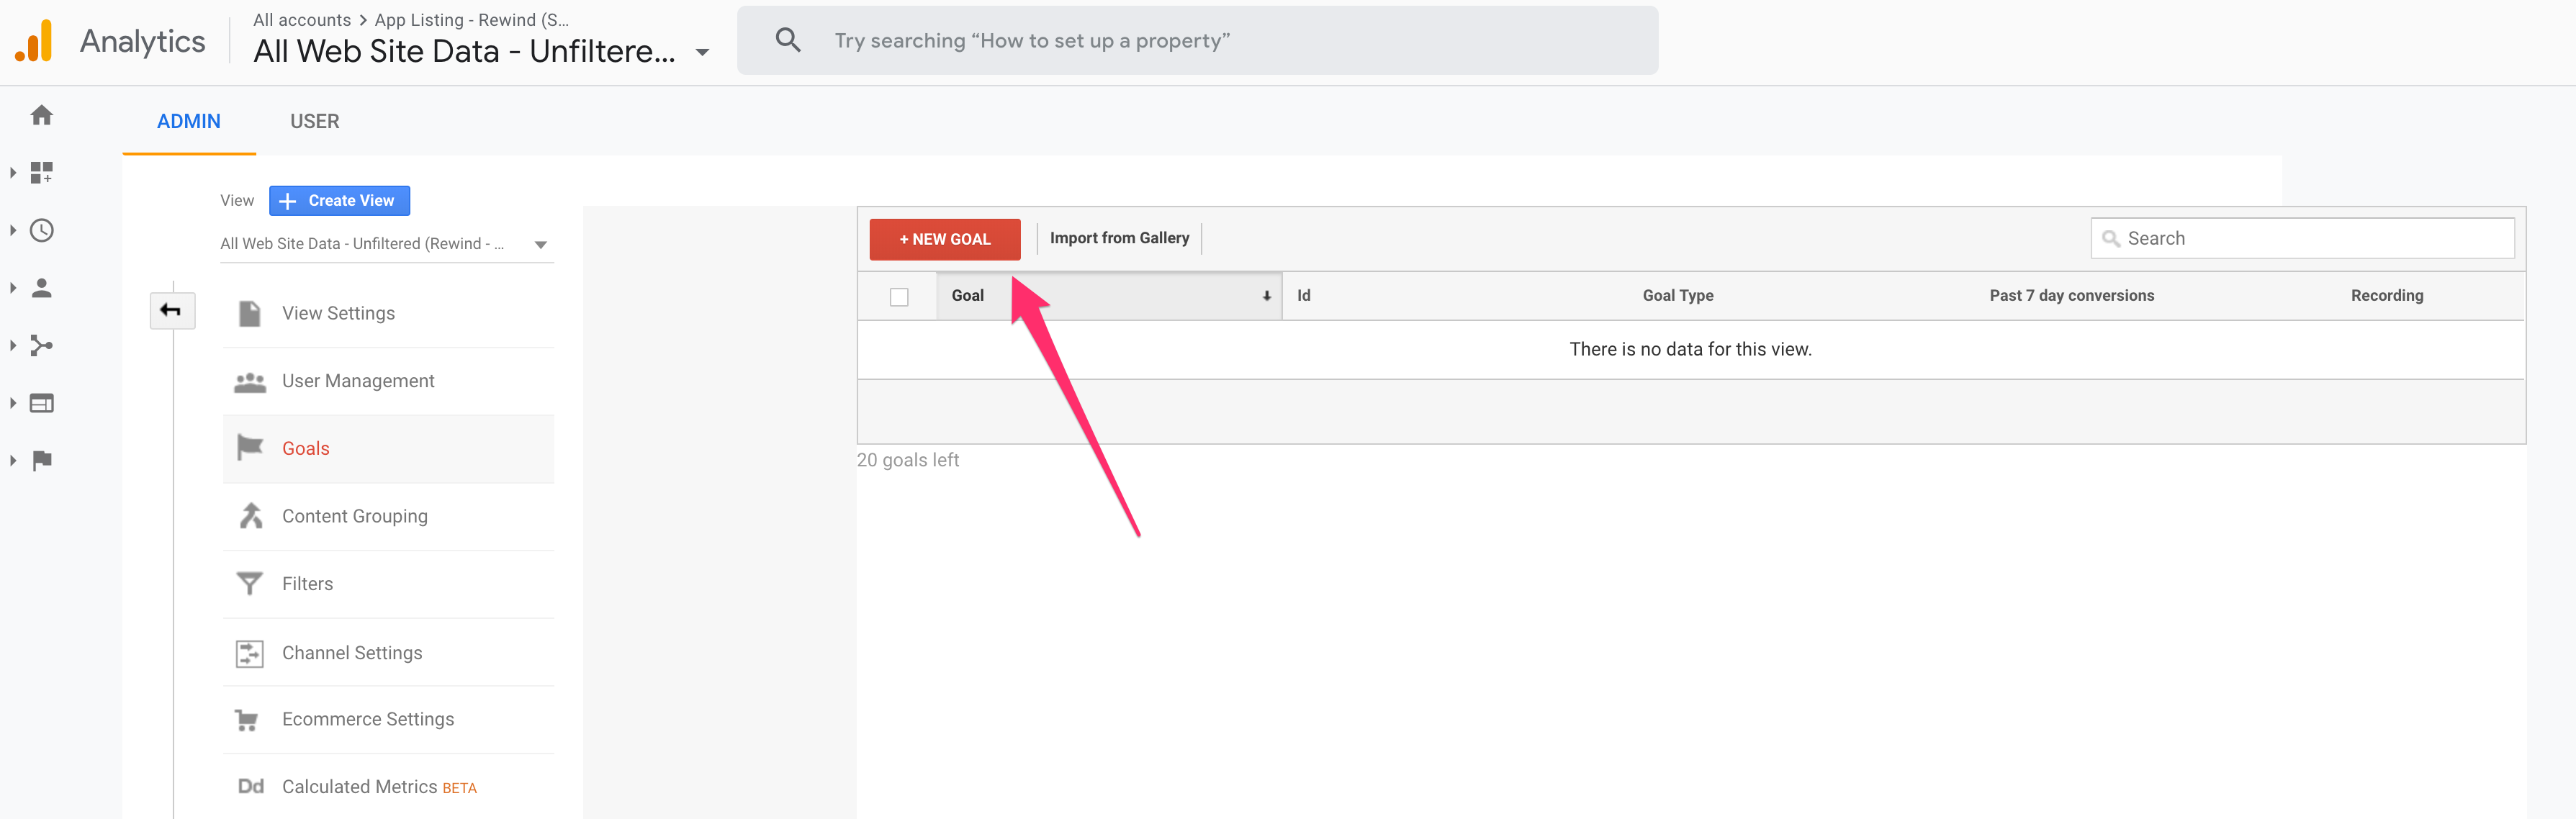
Click the big red [+NEW GOAL] button up top to get started.
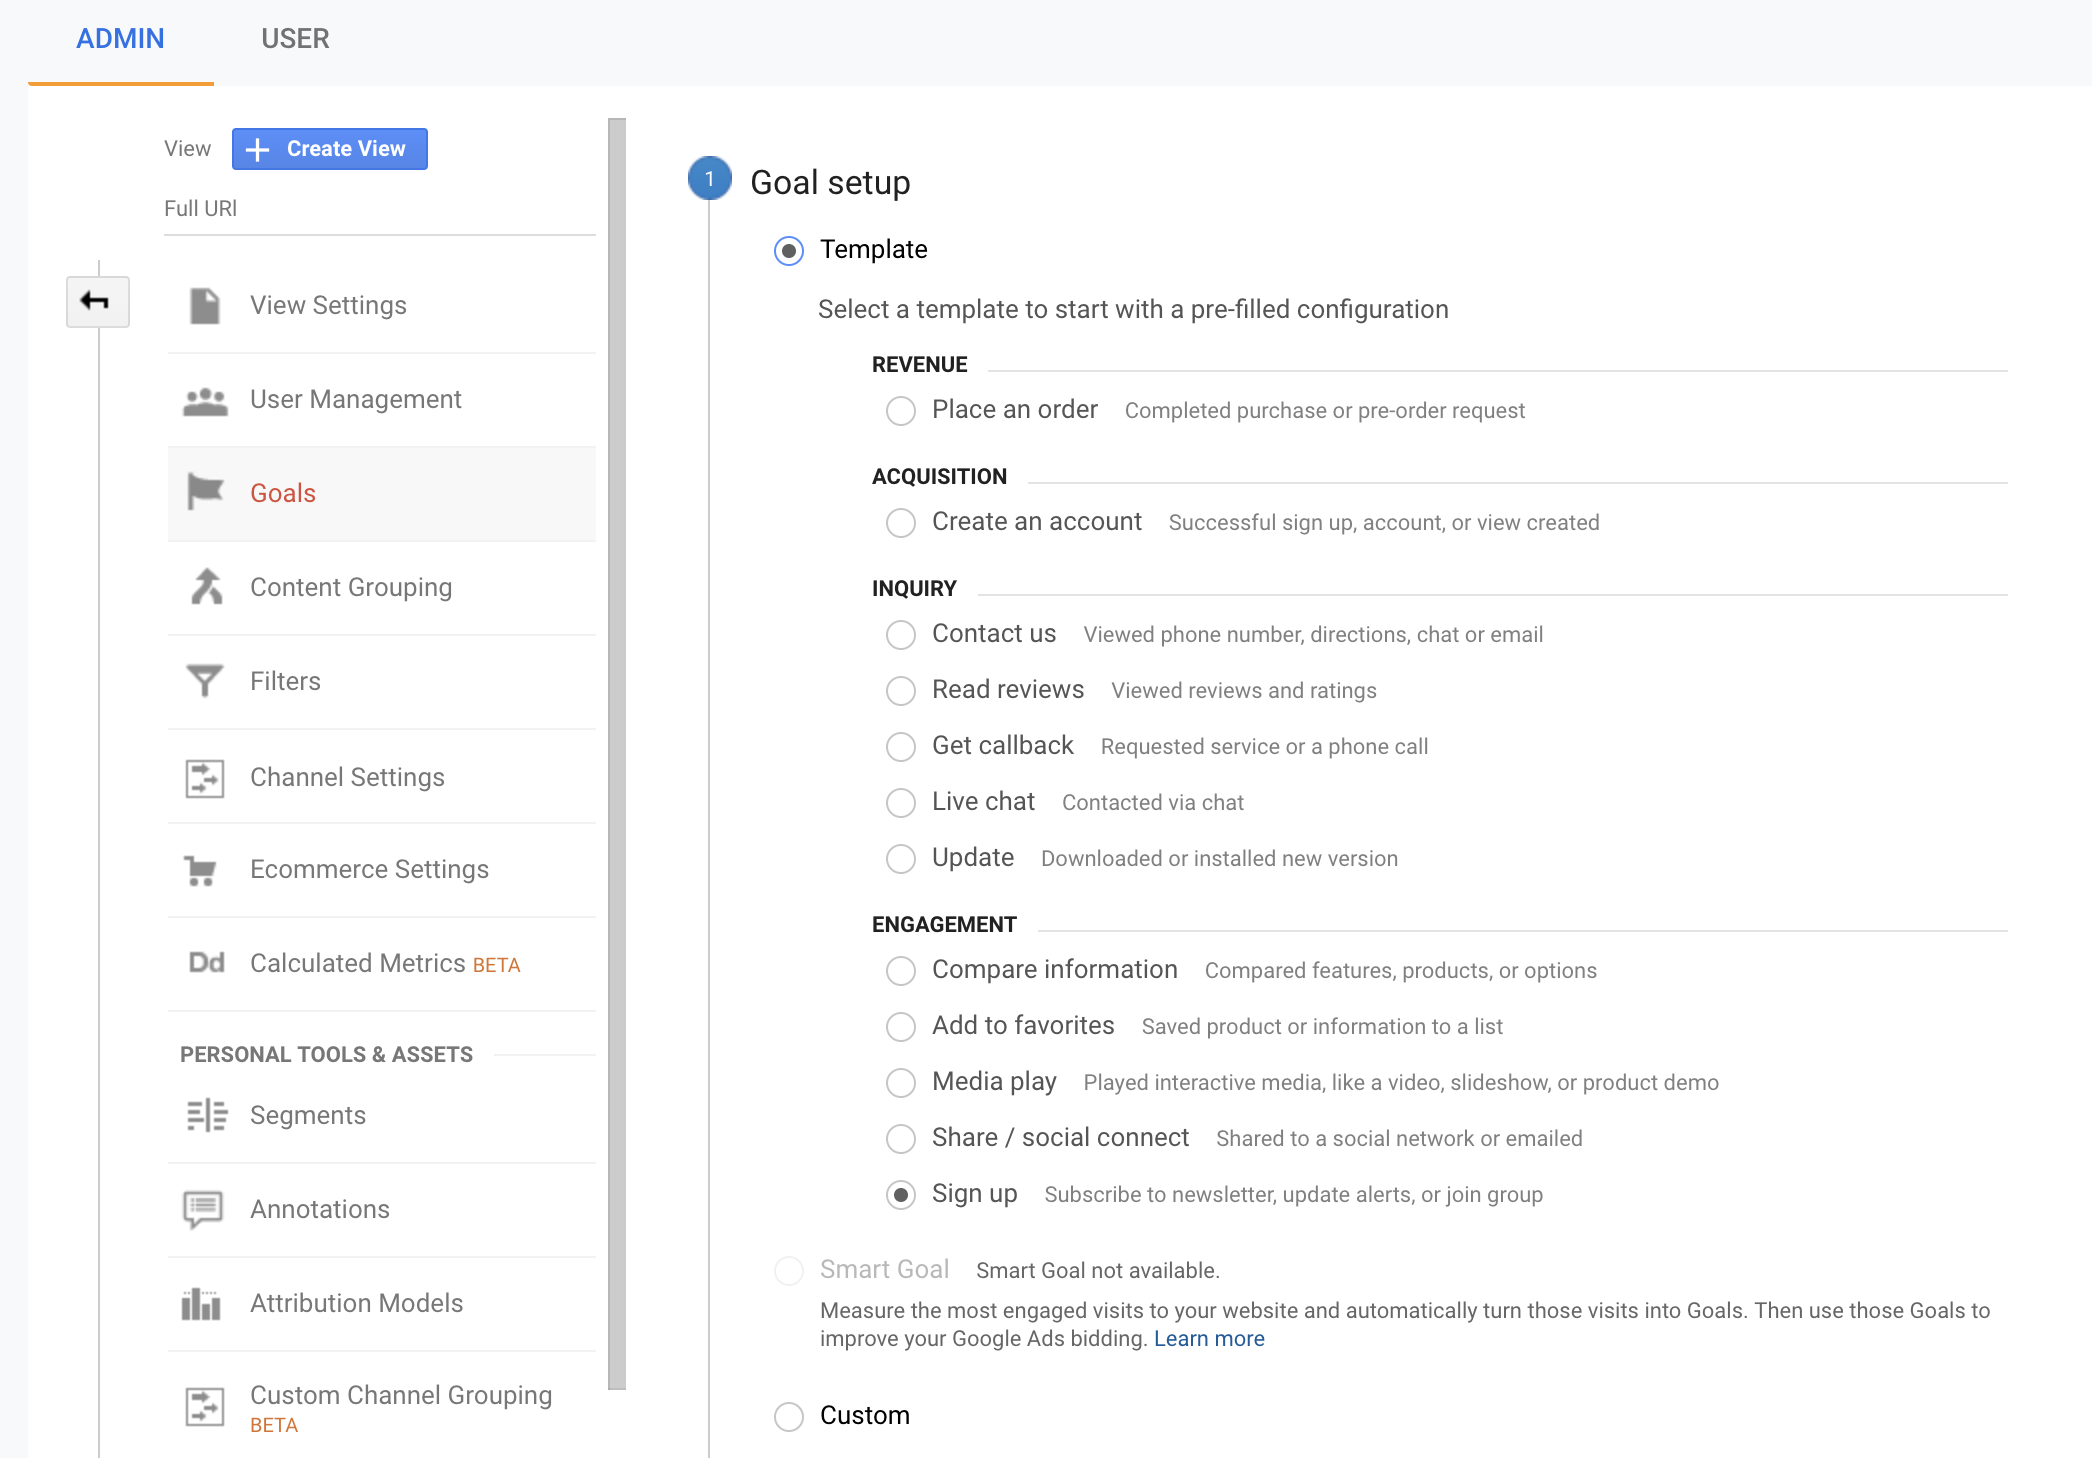
Step 1 – Goal Setup, choose the ‘Sign Up’ goal template.
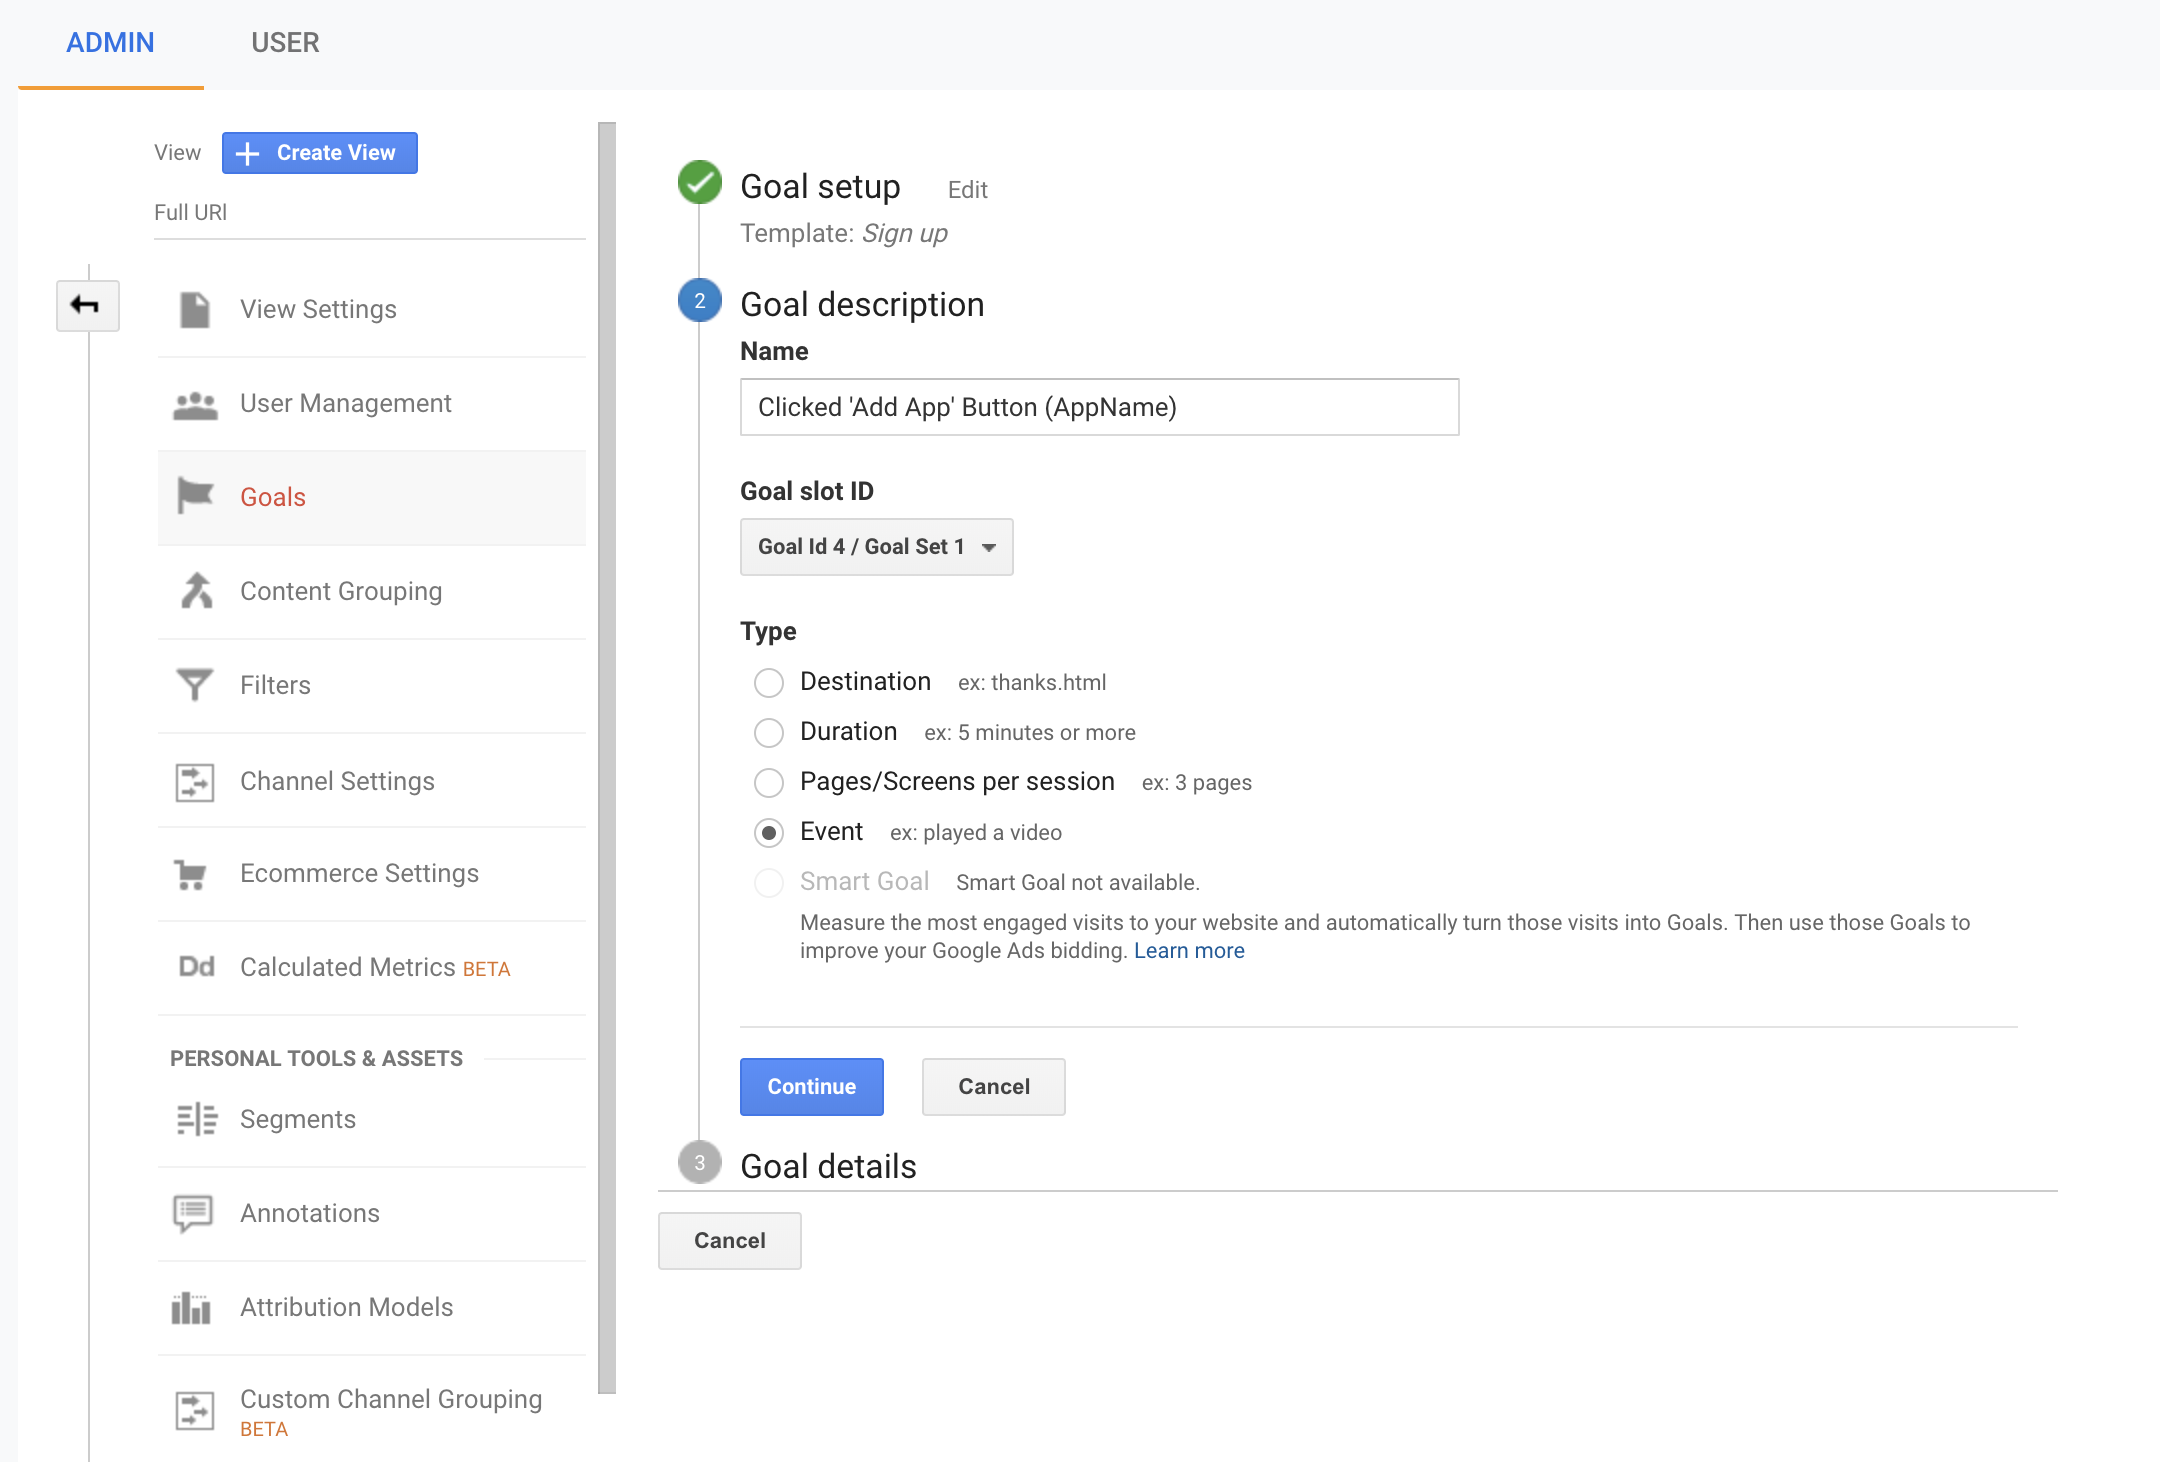
Step 2 – Goal Destination, name the goal whatever you like, ideally something memorable. I use “Clicked ‘Add App’ Button (AppName).”
Under the Type label, choose “Event”
Step 3 – Goal details; this brings you to where you will enter the details we saw when we inspected that [Add app] button earlier using Google Chrome.
Input the following:
- Category Equals to: Shopify App Store
- Action Equals to: Get App button
- Label Equals to: AppName – where AppName = what your app is called
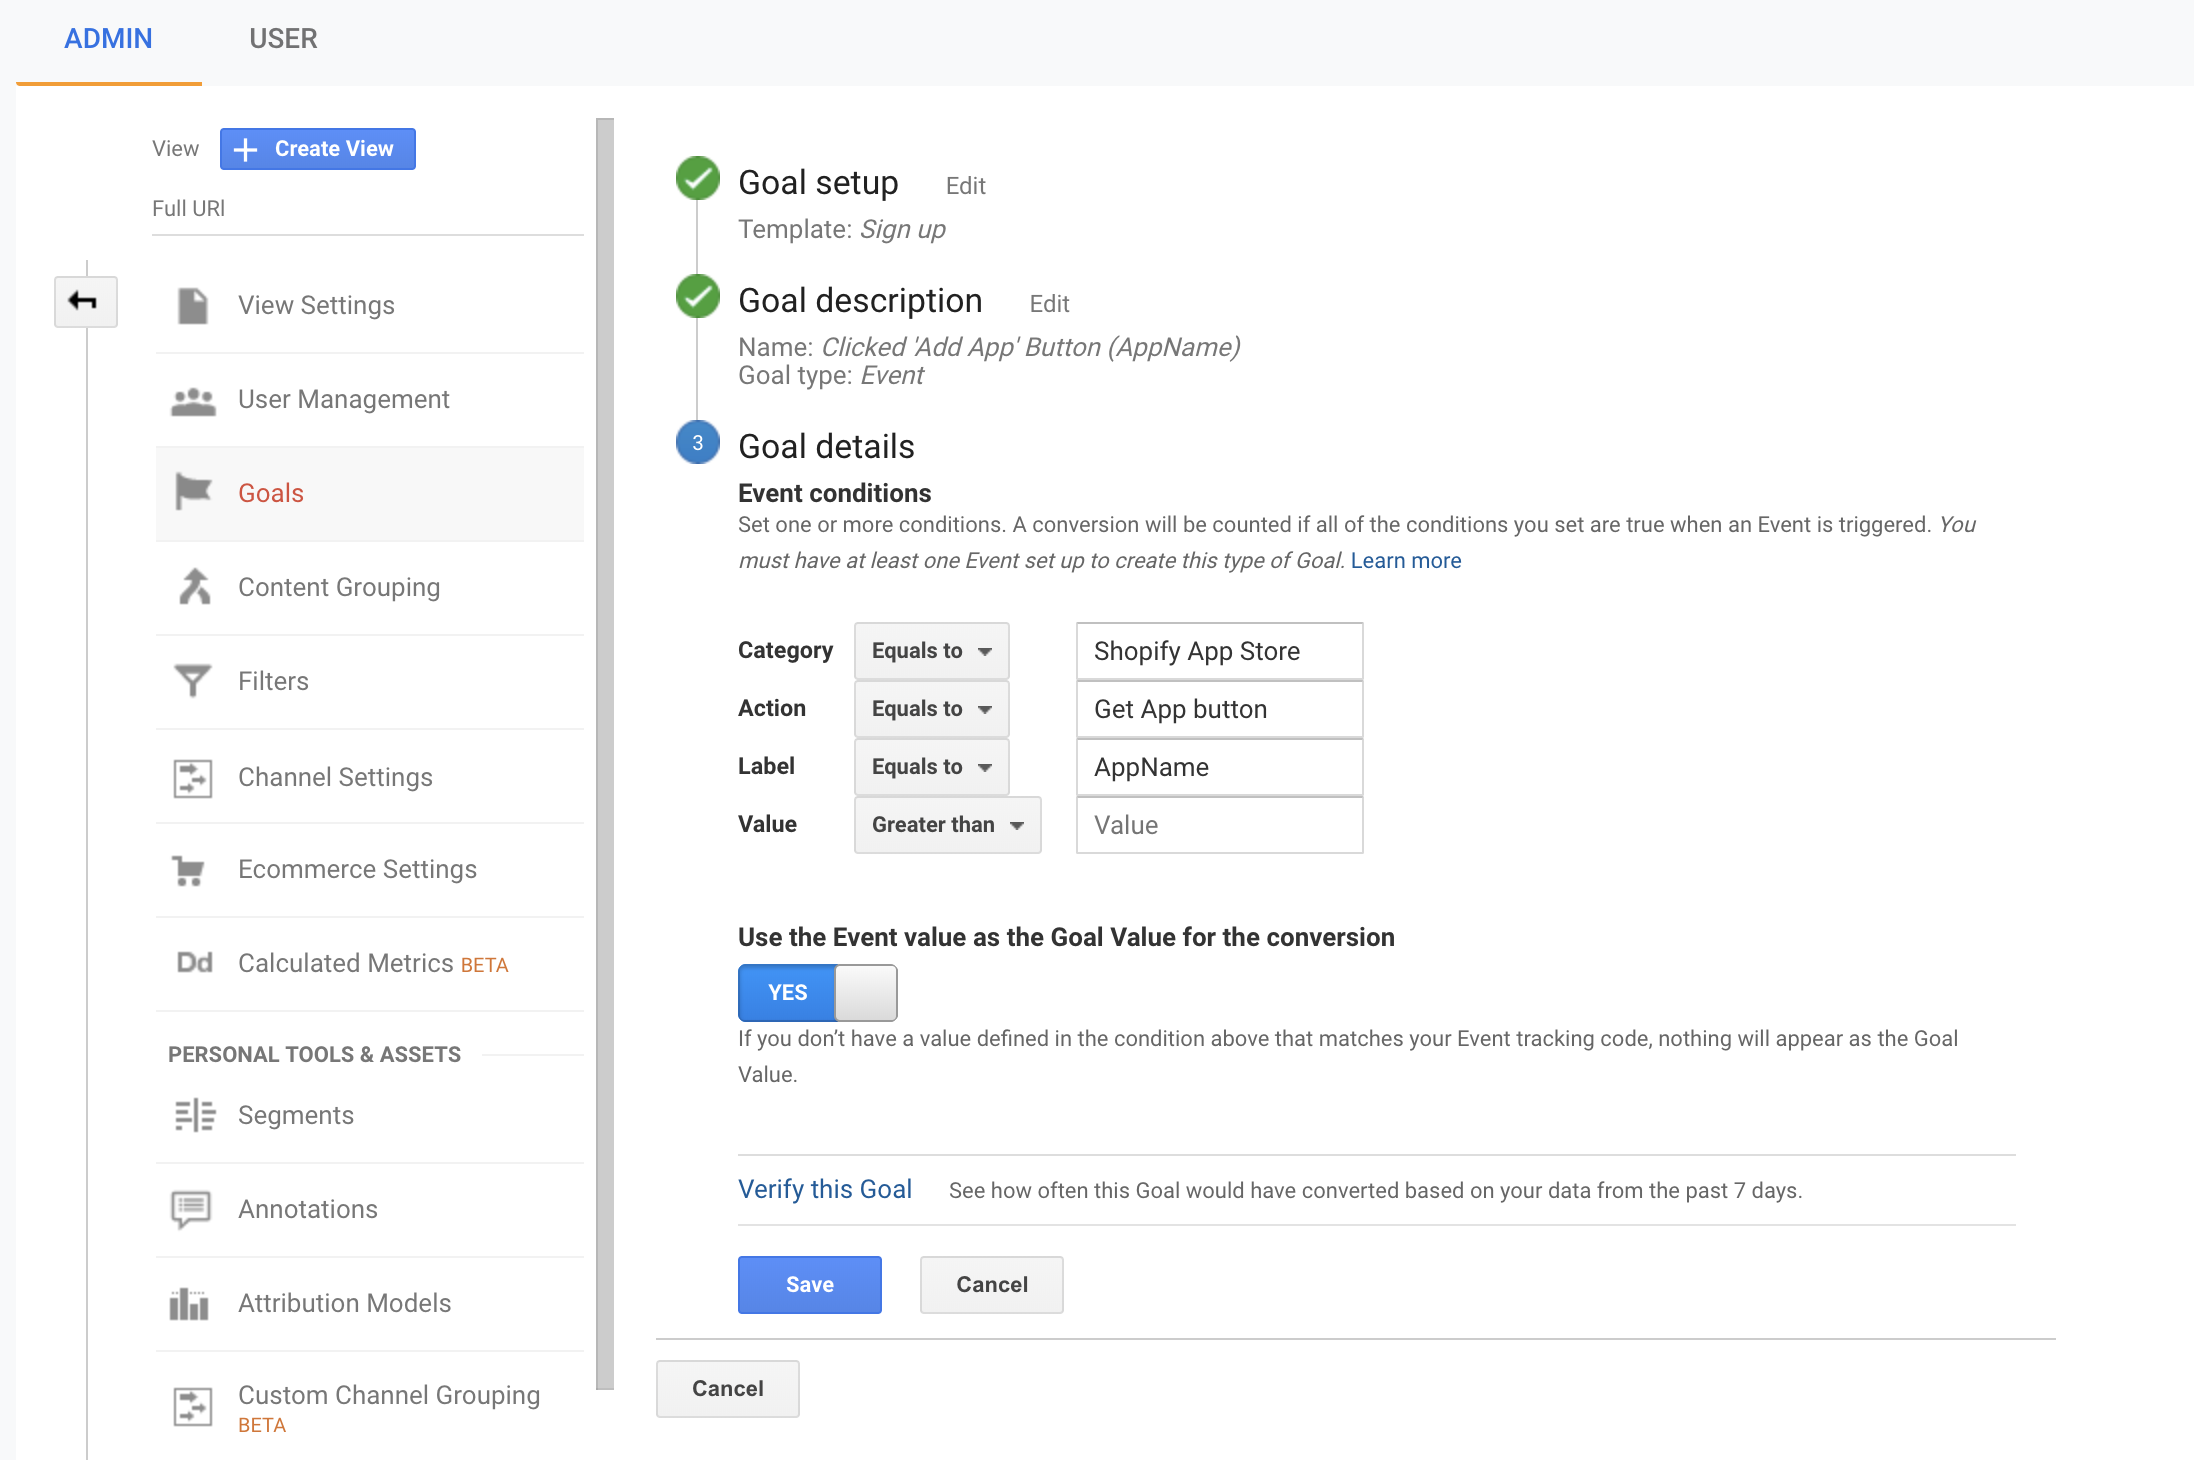
At this point, you’re 99% of the way there!
You can click “Verify this Goal” to see what % of visitors would have performed this action over the past 7 days. It feels pretty good if you’re doing this for the first time, you already had GA set up on your app listing before adding this Goal, and you see a value here. This was a little woo-hoo! moment for me.
Go ahead and click “Save” to set your Goal live and start tracking those [Add app] button clicks!
Take note: if you change your app name, you will need to update the Label value, or else this Goal will no longer pass information to your GA account.
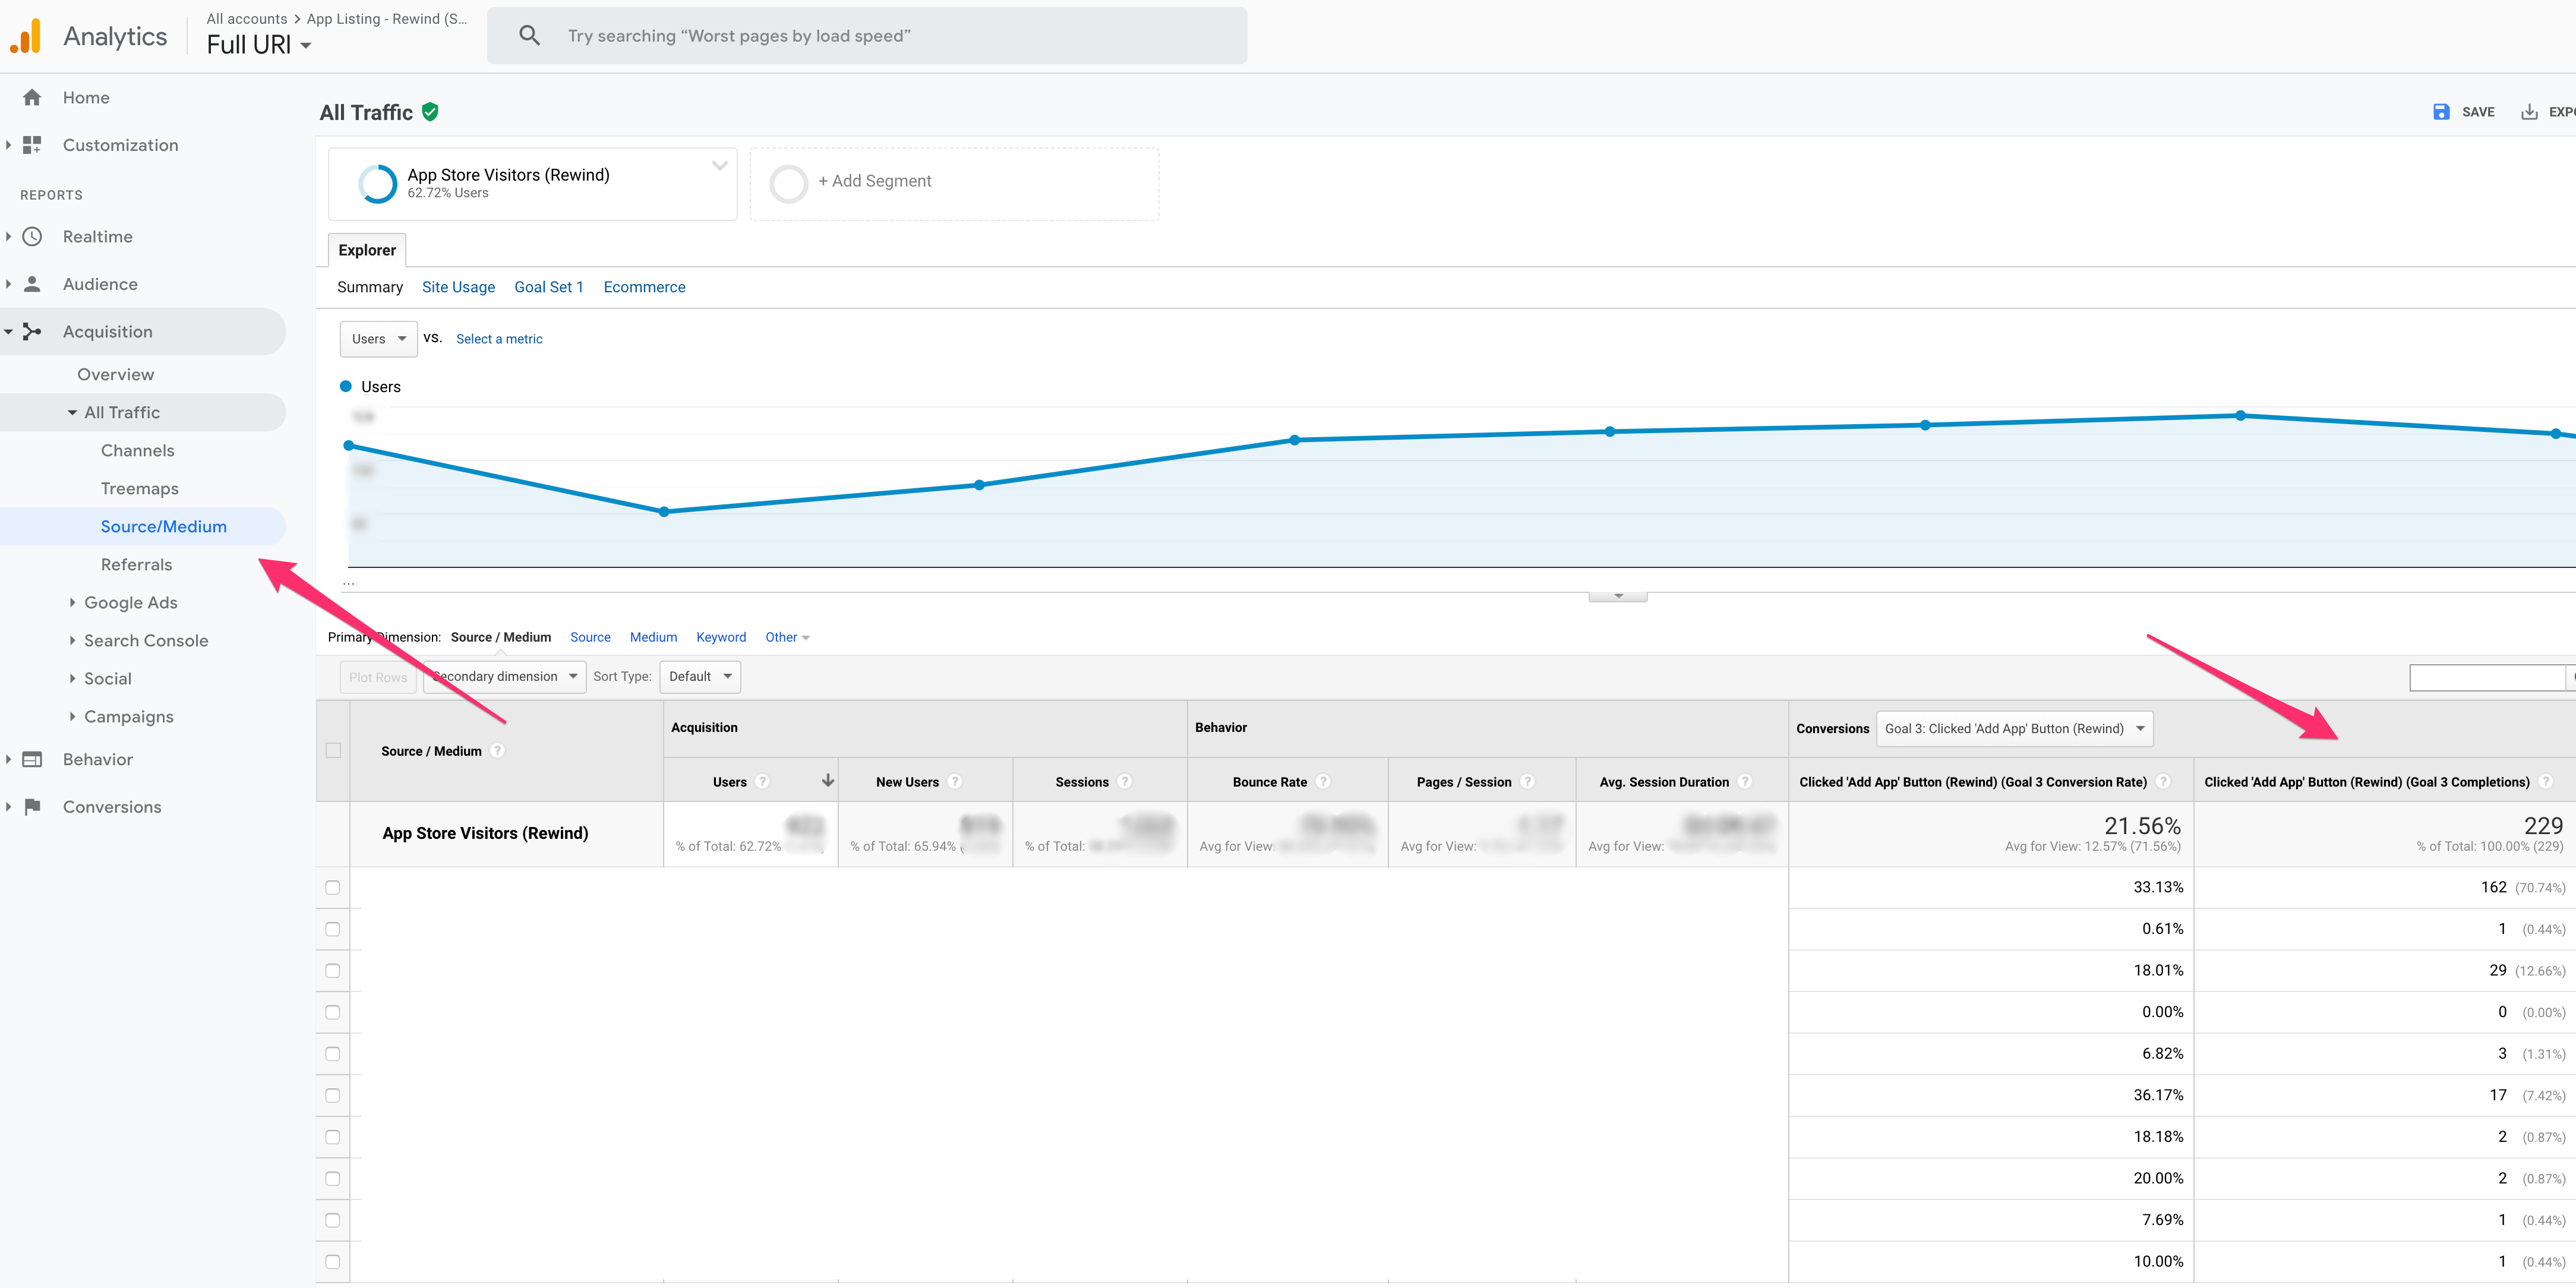
A few days after you’ve configured this Goal, you can start to gain valuable insights about the sources of traffic that are driving button clicks. To do so, click the Acquisition tab on your GA homepage, then click through to All Traffic > Source/Medium. Use the Conversions tab to select the Goal, and you’re set! You can now see what sources drive people to click your [Add app] button.
Caveats
Okay, so this still isn’t a perfect solution.
You’re not *really* tracking installs because it’s very possible that someone drops off after clicking that [Add app] button but before they complete your installation process.
This is still much better than nothing, and it provides a really valuable data point for all app devs. You’ll get a clearer understanding of what channels and campaigns, or specific blog posts and partnerships, are driving people to take action on your app listing. You can also start to measure the delta between the number of clicks you’re getting and the number of true installs you’re seeing.
Can this be improved?
Absolutely!
Cross-domain tracking needs to be enabled by Shopify. It requires Shopify to update the tracking script that’s built into the app store. If this happened, a merchant’s path could be followed from apps.shopify.com/YourApp through to YourApp.com/install without starting a new session.
Rumors are floating around App Developer groups that this is on the radar for at least one team at Shopify. Feel free to send it along or mention this to anyone you know at Shopify HQ 🙂
Let me know in the comments below if you think this setup can be improved or if you know another way to accomplish this!
You can visit both of our Shopify app listings using the buttons below:
Visit Rewind Backups for Shopify
PS – If you’re a Shopify Partner and want to earn up to $1,000 for each customer you refer to Rewind, learn more about our Partner Program by clicking the button below.
Join Rewind’s Agency Partner Program stephanie.szeto@rewind.io">