Deleting old GitHub repositories helps keep things clean and organized but before you take on a GitHub spring cleaning, make sure you understand GitHub backup and restore policies.
Accidents happen and it’s all too easy to delete the wrong GitHub repository in your organization efforts. While GitHub offers an option to undelete repos, there are limitations and release attachments, permissions, and issue labels are not restored.
Still, for personal projects, deleting old repos is an effective way to keep your GitHub account clean and organized. In shared organization accounts, it’s an important step to simplify your codebase.
So while deleting old GitHub repositories is good practice for overall GitHub account organization and hygiene, you need to have your own backup plan as GitHub native repository restore options are limited.
“You understand and agree that we will not be liable to you or any third party for any loss of profits, use, goodwill, or data, or for any incidental, indirect, special, consequential or exemplary damages, however arising…”
The 3-2-1 rule for GitHub backups
The 3-2-1 rule for SaaS backups says you should have:
3 copies of your data stored in
2 different locations in the cloud and
1 of which isn’t the SaaS provider – in this case GitHub.
Following the 3-2-1 rule for SaaS backup isn’t just best practice, it’s also the best way to restore deleted repositories in GitHub. Following the 3-2-1 rule offers peace of mind; if you lose GitHub data—whether to an accidental deletion or something more malicious—you always have your own backup to restore from.
Why would you want to delete a GitHub repository?
It’s a fair question; if you don’t delete GitHub repositories, you don’t risk deleting the wrong GitHub repositories.
For me, hitting the delete button on repositories I no longer need is a way to keep my workspace clean. It’s not uncommon for projects to begin separately before being merged later. In that case, one of the merged repos is deprecated and should be deleted.
Sometimes an organization flat out cancels a feature or product line. In that case, the code may sit around for a while and at some point, it should be deleted.
Finally, when forming a new GitHub organization where code is moved from a personal account, old repositories may no longer be needed and can be removed.
Why would you want to recover a deleted GitHub repository?
The main reason for wanting to recover a deleted GitHub repository is that “uh-oh” moment when you realize you need to access an important file that’s now gone.
Maybe it’s an old environment variable, a handcrafted .gitignore file, or a complicated configuration file that would be useful to copy. You could be re-implementing a feature and can’t remember the workaround for a specific browser incompatibility. You might have forgotten the name of a library you used before. You might want to check the issues in an old repository. You could just want to revive an old project that you gave up on previously.
Whatever the reason, if you’re deleting GitHub repositories, at some point you’ll probably need to restore GitHub repositories.
Repository recovery Method 1: Using the GitHub user interface
GitHub has a native option to recover a GitHub repository but it is limited. Without a backup plan in place, this is your only option to recover a deleted repo.
If you deleted your repo in the last 90 days and it is not a part of a fork network, you can recover it directly in the GitHub UI.
If your repository was part of a fork network, it cannot be restored unless every other repository in the network is deleted or has been detached from the network.
A fork network consists of a parent repository, the repository’s forks, and forks of the repository’s forks.
Recover a personal GitHub repositorty
The process to recover a deleted GitHub repository differs slightly depending on whether your code is in a personal or organization account:
If you are recovering a personal repository that is not part of an organization, start by opening “Settings” in the top right dropdown menu, then the “Repositories” menu item.
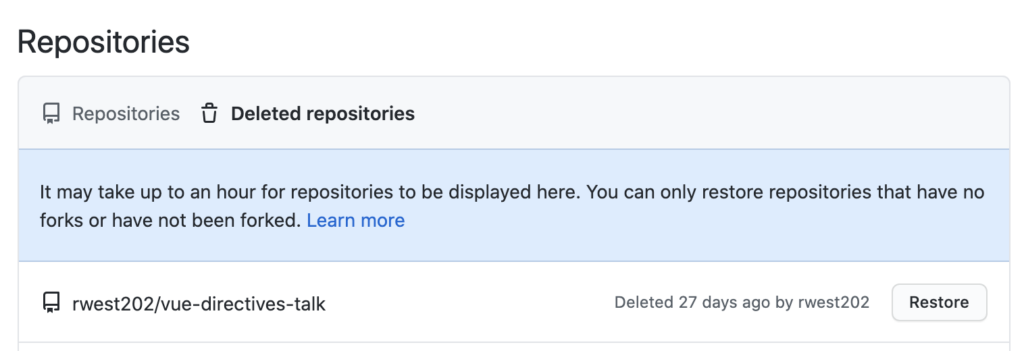
Select the “Deleted repositories” item in the top bar.
Any repo that was deleted within the last 90 days and is not part of a fork network (as mentioned above) should show up in this list. If you don’t see your repository under the deleted section, give it some time; GitHub advises that deleted repos can take up to an hour to show up in this list.
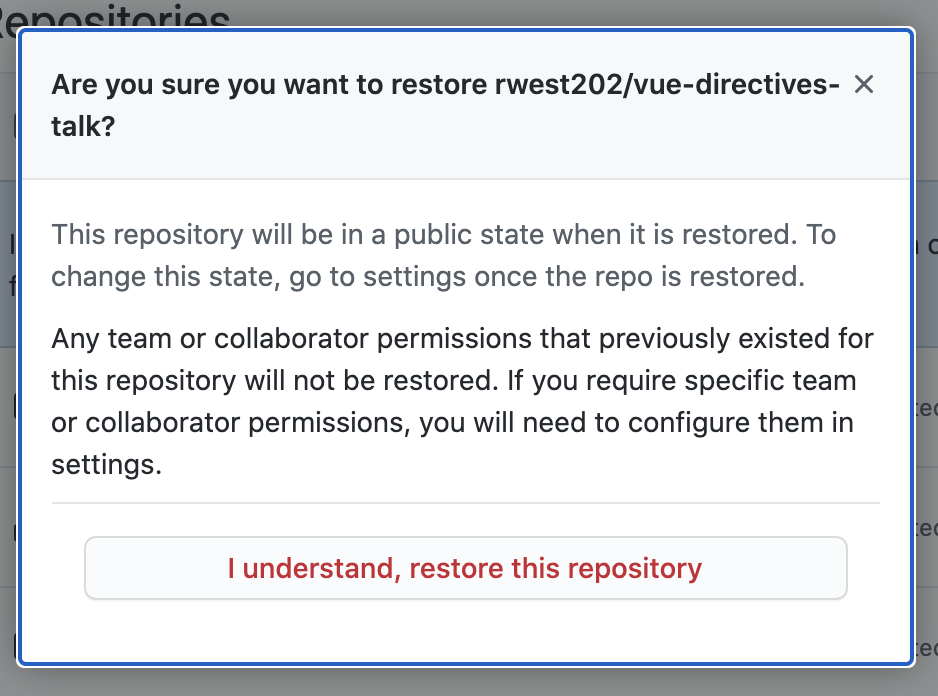
Click Restore and a caution message will appear. Confirm it to bring your repository back.
After a few seconds, the repository will show as “Done!” You’ll see the repo back in your list.
Recovering an organization GitHub repository
If the repository you need to restore is a part of an organization, start from the organization page.
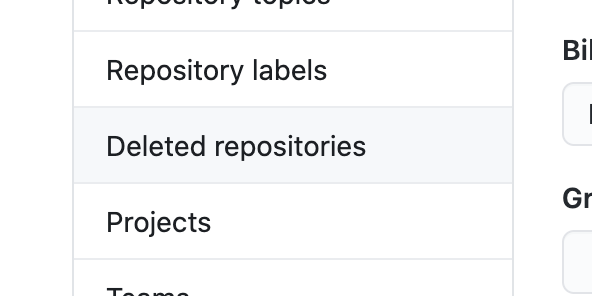
This time, the option for “Deleted repositories” is available directly from the organization settings.
Follow the same restoration steps as outlined above for recovering a personal repository.
The option to recover a deleted GitHub repository is helpful, assuming deleted repositories meet the criteria discussed. Just be aware of the limitations and be especially mindful of the 90-day limit for recovering deleted GitHub repositories.
When you need a longer-term backup or you have specific compliance requirements to meet, there is a better solution.
Repository recovery method 2: Restore from your own backup
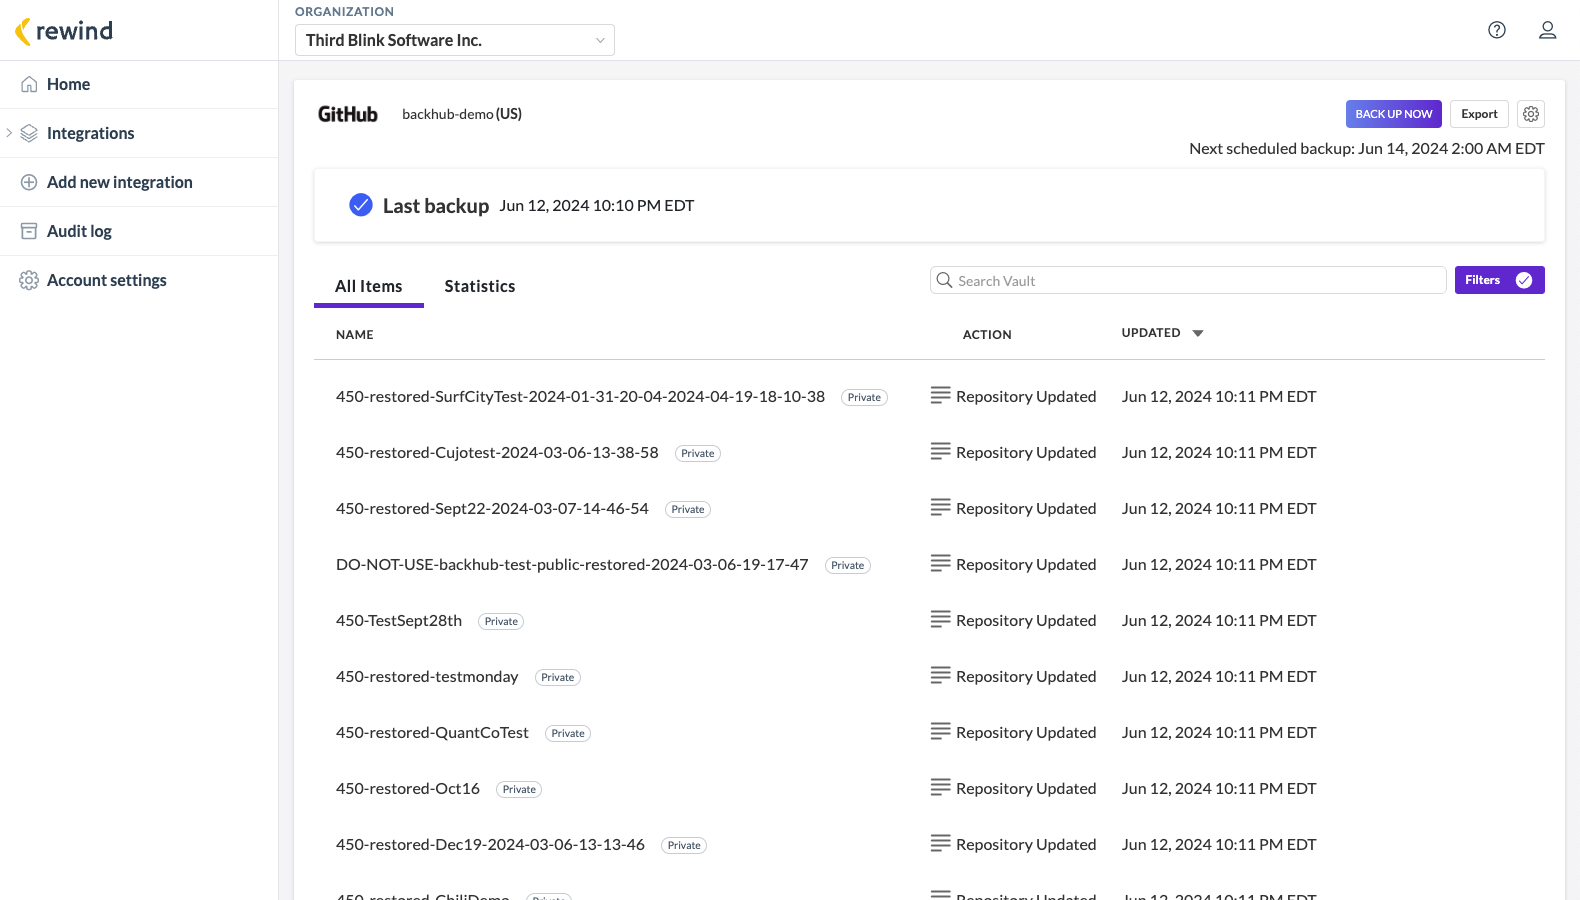
Choosing Rewind backup and restore for GitHub doesn’t just allow you to restore GitHub repositories exactly as they were beyond the 90 day window. It also provides a full backup of all your GitHub data, allowing you to recover from any data loss event. Rewind for GitHub offers:
Nightly backups
Sync to Amazon S3
Audit log
Complete backup and restore for issues, milestones, pull requests, etc.
Restore directly to GitHub
365 day retention
What Rewind backup and restore for GitHub really offers is peace of mind. In the event of a data loss event—whether an accidental deletion or an attack—you always have a backup plan. You can roll back your entire GitHub instance to a point in time, restore a GitHub repository with all dependencies, or get granular to recover just the specific data you need.
How to restore a GitHub repository with Rewind
The first step to restoring GitHub data with Rewind is to add Rewind as an app in GitHub.
Rewind will complete a full, secure backup. After the initial backup is complete, Rewind will perform daily automated backups.
Rewind Backups include metadata in addition to the complete repository with its branches and backs up all your pull requests, issues, milestones, comments, tags, commits, etc. See the full list of everything you can backup and restore in GitHub with Rewind.
You can directly restore any repository and associated metadata to your GitHub account by clicking restore after choosing a repository and a date in your Rewind Vault.
Rewind will create a new repository in your account and push the deleted repository and all metadata via the GitHub API.
Note that @mentions are not linked to prevent flooding users with notification emails. Likewise, issues will not be assigned when restoring a GitHub repository for the same reason. These details will be included in the issue description.
As your GitHub data is being restored, you’ll see a status message at the top of the dashboard.
As soon as restoration is complete, that status message will update.
And just like that, your data has been restored in GitHub.
In this post, you’ve seen two methods for recovering deleted GitHub repositories. While GitHub’s UI offers a free solution, the 90-day time limit and failure to support forked repositories hamper its utility.
Rewind Backups for GitHub allows greater flexibility and retention and the option to store your backups in your own S3 bucket. With Rewind, audit logs, data residency options, and an overall commitment to security also support organizational compliance.
While Rewind integrates with GitHub, it is not built in; you need to plan ahead. GitHub data needs to be backed up before it can be restored.


 Ryan Westerberg">