Bitbucket, like other version control systems, is used to manage source code data and other digital assets in your collaborative environment. Repository data stored in Bitbucket is usually essential to the continuous operation and survival of businesses. That’s why being able to seamlessly import and export this data into your Bitbucket instance as a readily available functionality is a necessity.
Bitbucket’s import and export capabilities can be beneficial for all kinds of individuals in an organization, including developers, DevOps engineers, and managers. These features can help efficiently manage repositories and associated data, making project information readily accessible whenever it’s needed, regardless of whether it’s for migrating to a new platform or for data backup purposes.
This article covers everything you need to know about exporting and importing data in Bitbucket. It includes step-by-step instructions, best practices, and troubleshooting tips.
Why you need exports and imports in Bitbucket
There are several reasons why organizations would want to import or export data from Bitbucket accounts:
- Data backup and restore: Even though Bitbucket doesn’t provide an automatic built-in backup and restore feature, importing and exporting your data manually or with a third-party automated tool like Rewind allows you to back up your repositories and restore them as needed. This process ensures no data is lost during downtimes, hacks, or other disasters. Remember, Atlassian (the owner of Bitbucket) explicitly states in their terms of service that “we are not responsible for any of your data lost, altered, intercepted or stored across such networks.”
- Data migration: If you need to move your data repositories across accounts or version control platforms or from an on-premises server to the cloud, the import and export functionality makes it easy to move your repositories, including all the project information, metadata, permissions, and version history.
- Collaboration: Importing and exporting Bitbucket data can be useful when collaborating with teams that use different version control systems. You can achieve this by importing the other team’s repositories to your Bitbucket account or by exporting changes from your account to their system. Additionally, importing and exporting Bitbucket data can also be necessary when creating a fork of an existing project.
- Compliance: To comply with legal or regulatory requirements such as SOC 2–compliant backup, audit trails, and data retention policies, exporting your repository’s history and metadata may be necessary.
Regardless of your requirements, incorporating import and export functionality for any version control system can enhance your DevOps efforts to improve development cycles by ensuring the prompt availability of data to all stakeholders. This, in turn, aids in improving development cycles.
Importing data into Bitbucket
If you want to migrate your existing code base from another version control platform or from your local system into Bitbucket, there are a few things you need to consider. First, you need to know what types of data Bitbucket allows during the importation. You also need to know how Bitbucket will process the imported data.
The Bitbucket importer allows you to import versioned data from Git-based platforms like GitHub and CodePlex. Even non-version-controlled files can be imported, but they must be converted to Git format first. Additionally, you can import issue data independently into your Bitbucket Cloud issue tracker or from one repository to another. For this, a ZIP file format containing a .json file with fields related to the issues—such as comments, attachments, logs, and versions—must be used. Once the import is complete, the archived issue data is automatically extracted, and the relevant data mappings are performed for seamless migration between Bitbucket repositories.
Other types of project and repository data that can be imported into Bitbucket include pull requests, project permissions and access levels, project forks, repository-level permissions, and repo access levels. On the other hand, Bitbucket will not allow the migration of project data like Git Large File Storage (LFS), access keys and tokens, webhooks, repo reactions/likes, commit comments, or files.
Now that you know what you can and cannot import, let’s take a look at a simple step-by-step approach to import data into Bitbucket.
Create a new repository
Provided you already have an active Bitbucket Cloud account, the first thing you need to do is create a new repository that will hold the incoming data from an external repo or platform. You can do this easily on the Bitbucket Cloud platform by selecting the blue Create button on the top of your home page screen:

Then, in the dropdown menu, select Repository. When done, you should see something like this:
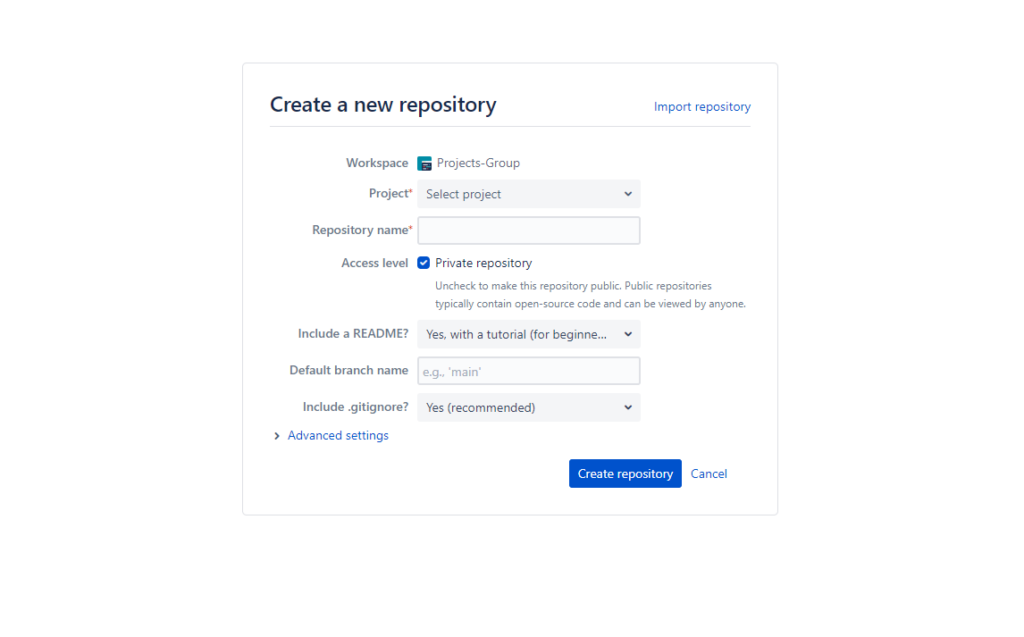
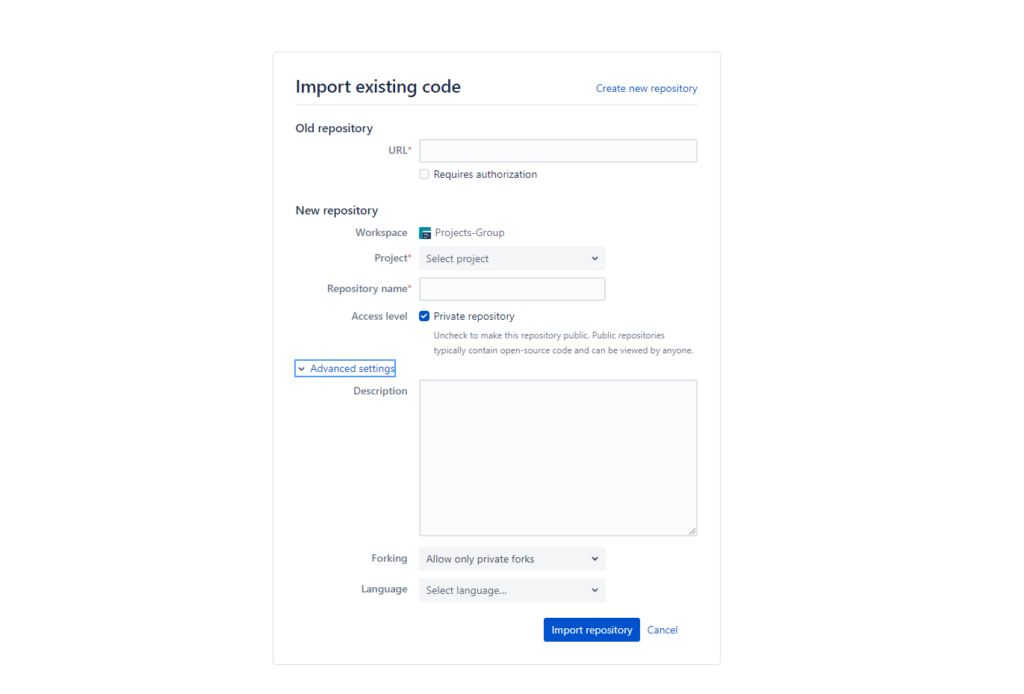
Select Import repository in the top-right corner to import your existing code. The resulting page shows you a form that allows you to connect to the source repository:
Import your data
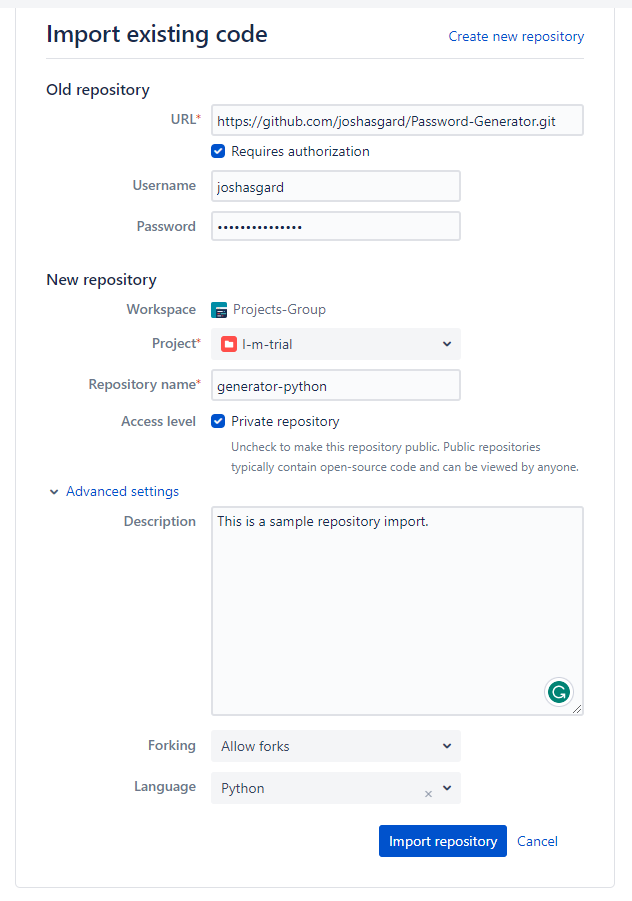
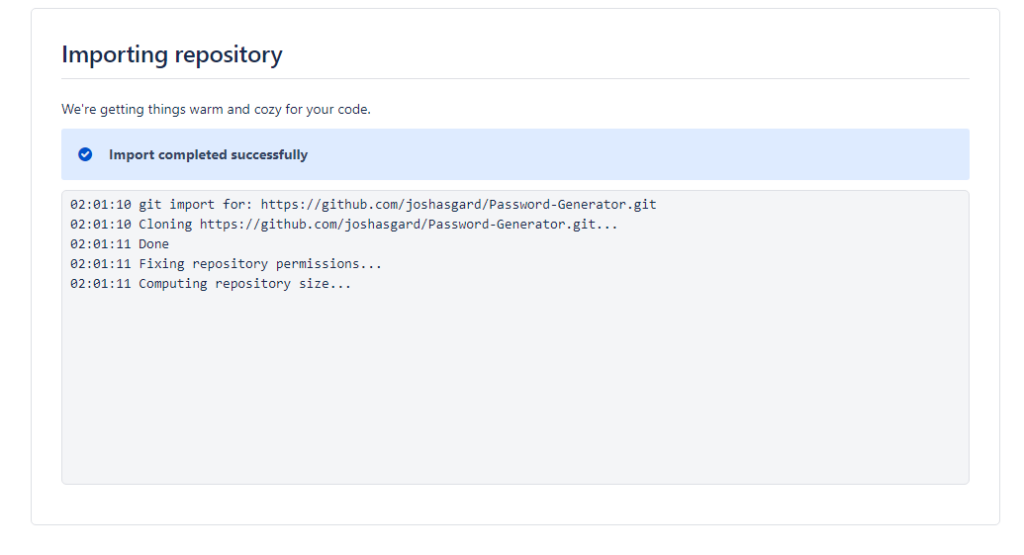
On the Import repository page, you need to provide the source version control platform to import your repository. The supported sources include CodePlex, SourceForge, and Git. This means, if you want to import a sample project from GitHub with the HTTPS URL https://github.com/joshasgard/Password-Generator.git, you need to enter the project URL, your Git username, and your password.
On the same page, you’re also allowed to either import the incoming data into an existing project in your Bitbucket account or to create an entirely new project by entering a new project name in the Project field. For example, in the previous project, the incoming repository data is being imported into an existing project named “I-m-trial”.
Update your advanced settings
While you don’t need to update the advanced settings, it can be nice to have them during imports. For instance, advanced settings let you proactively and instantly restrict access permissions to your imported data by allowing only private users within your organization to create forks. In addition, you can write a quick description of the imported data for future reference.
On the import page, expand the Advanced settings button at the bottom of the screen to provide a new description for the imported data, preselect the programming language of the repo, and manage forking permissions. When filled in, your form should look something like this:
Import the repository
To initiate the data import, select Import repository at the bottom of the form. You should see a progress bar that shows the state of the import. When the progress bar reaches 100%, you should be notified that the migration was successful:
Similarly, if you have an unversioned code base you want to migrate to Bitbucket, you need to add the project to a Git repository on your local terminal, as explained in this documentation. Then, you can follow the instructions above to migrate across Bitbucket accounts.
Exporting data from Bitbucket
To export data from Bitbucket to other platforms or your local system, it’s important to have a clear understanding of the available data types and any potential limitations that may apply. For instance, you can export entire projects and repositories—including pull requests, comments, and attachment history—from a Bitbucket data center instance to another deployment or server. This functionality is accessible to customers with a subscription to the Bitbucket Data Center instance.
In addition, Bitbucket repository issues can be exported directly from the Bitbucket Cloud platform with administrative access to the respective demo the data is extracted from. The issues can be downloaded to your local machine as a ZIP file containing data fields for Bitbucket imports.
Exporting your data from Bitbucket depends on whether your organization uses Bitbucket Cloud or the data center and server and the destination platform. Many of the methods are manual and often laborious to execute on large projects. However, there are some third-party tools like Rewind that can integrate with Bitbucket to enable automated exports for backups.
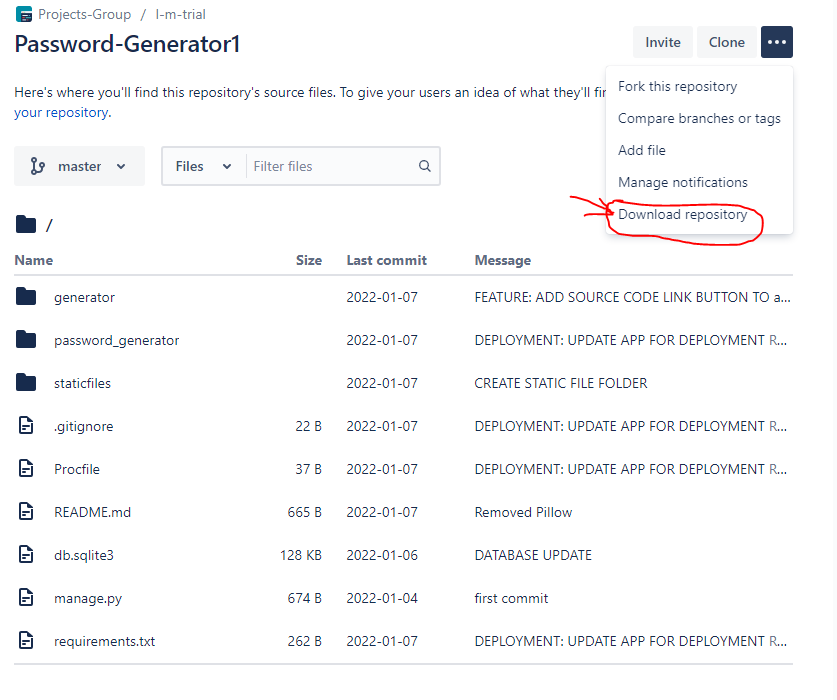
The most straightforward method for exporting data is to manually download the repository data to your local machine from your Bitbucket Cloud account. You just need to download your repo as a ZIP file to your local disk, and from there, you can create backups or upload it to a new platform:
Another approach is to create a clone of the repository using the git clone command from your terminal. This approach is well documented, and you can check out this article to get started.
If you’re a subscriber to the Bitbucket Data Center, you can carry out data exports (and imports) by making use of the REST API architecture provided by Atlassian. This architecture allows you to make API calls to export your enterprise-scale Bitbucket data to external platforms and even build your own system for automation. The following steps highlight this approach using a simple Python script to make calls to execute Bitbucket exports from your machine.
Note the project or repository URL you’re exporting
To make calls to execute Bitbucket exports from your machine, you need to confirm the URL of the project or repository you want to export to your Bitbucket account. The URL usually looks like https://bitbucket.example.com/projects/PROJECT/repos/REPOSITORY, where the “PROJECT” is the project name/key and “REPOSITORY” represents the slug as specified in the API documentation. For instance, the repo URL https://bitbucket.example.com/projects/group-projects/repos/generator-python will have a group-projects project key and a generator-python repository slug. This information will be used to build your request to the Bitbucket API.
Build and export the request body
The request body allows you to either export all the repositories in your Bitbucket one project at a time or one repository inside a project. For instance, you can export the generator-python repository mentioned previously with a request body of the form:
``json
{
    "repositoriesRequest": {
        "includes": [
            {
                "projectKey":"group-projects",
                "slug":"generator-python"
            }
        ]
    }
}
Make an export request to the Bitbucket API URL
To bring everything together, you need to make the Bitbucket data export request by sending the request body above as a payload in an HTTP POST request to the Bitbucket API export URL. Your Bitbucket API URL for data exports should look like http://{baseurl}/rest/api/latest/migration/exports, where your base URL will be your Bitbucket server address. You can make this request with your preferred library and programming language. Using the Python requests library, run the following script to execute the Bitbucket export:
```python
import requests
import json
url = "http://{baseurl}/rest/api/latest/migration/exports"
headers = {
  "Accept": "application/json",
  "Content-Type": "application/json"
}
payload = json.dumps( {
  "exportLocation": "example/sub/directory",
  "repositoriesRequest": {
    "includes": [
      {
       "projectKey":"group-projects",
       "slug":"generator-python"
      }
    ]
  }
} )
response = requests.request(
   "POST",
   url,
   data=payload,
   headers=headers
)
print(json.dumps(json.loads(response.text), sort_keys=True, indent=4, separators=(",", ": ")))
```
The response from the request will contain a <Job ID> that you can use to query the export status and identify the exported data in your file path. When the migration is complete, the exported repository data can be accessed in the $BITBUCKET_SHARED_HOME/data/migration/export/Bitbucket_export_<Job ID>.tar file path.
For more information on how to work with the Bitbucket REST APIs, check out this documentation.
Best practices for Bitbucket migration
Whether you’re importing or exporting, it’s recommended that you conduct a risk assessment and set expectations prior to starting a Bitbucket migration. This is particularly crucial when dealing with mission-critical data like application source codes or any other data that will adversely affect the survival of your business if it’s lost.
In addition, to improve the likelihood of a successful import or export, it’s recommended that you take certain steps and consider various factors before and during the migration, including the following:
Consider the data entities you’ll be migrating
As stated previously, you need to know the type of project data that can be imported and exported before you begin a migration. For example, Git LFS objects that contain attachments to your repo issues and comments are never exported by Bitbucket together with project data extracted from the instructions above. For this reason, Bitbucket provides a separate Git LFS migration process.
You need to carefully consider the type of data you want to migrate, your goals, and how you can optimize the migration processes. If your reason for running an import or export in Bitbucket is to migrate data like merging checks, branch permissions, or large repository files, then Bitbucket imports and exports are not very useful. However, if you want to migrate specific data points rather than the full repository data, you can optimize the process by specifying your desired data, saving time and resources. To review the full scope of the data, you can use the Bitbucket preview API for previewing your data exports before execution.
User interface vs. REST calls
Your Bitbucket license may restrict your choices to either Bitbucket Cloud GUI, REST APIs, or both for conducting cloud migrations. The Bitbucket cloud GUI on your account allows you to carry out imports (as explained previously) into your account with the ready-made tools, but it limits your ability to customize and automate.
Making REST calls gives you more flexibility on the tools to use and how frequently you want to carry out the migrations, provided you have the technical know-how. The downside of this is that building and maintaining a new set of software to manage Bitbucket backups and migration at scale can be time-consuming and costly. Reliable third-party products like Rewind can help companies overcome this challenge with prebuilt and well-maintained connections for Bitbucket and other source control platforms.
Consider your disk space
Insufficient disk space can cause the migration to fail even after a lot of time has passed. It’s best practice to always check that you have more than enough disk space on your machine before the export or import starts.
Import and export time
There is no perfect way to predict the amount of time your migration will take. Both import and export durations are dependent on several factors, including the size of the data set, network traffic, and number of repositories. Generally, an import takes about four times as long as an export of the same size. This makes planning ahead as important as the migration process itself.
Don’t migrate third-party plugins
If you have third-party plugins in your current version control system, they won’t be migrated with the repositories during imports and exports. Instead, you can install the plugins you require on the destination system or contact your plugin developers to create a migration plugin module.
Use the same user directory for permissions
Because user permissions on projects and repositories are migrated and matched, it’s advisable that the same user directory is used in both the source systems and the destination systems. Doing so helps avoid username conflicts that may arise and cause troublesome permission mismatches.
Troubleshooting tips for common issues
While it would be ideal to prevent any problems in the import and export process, issues are bound to arise. Let’s take a look at some of the most common issues and how you can avoid them:
- Naming conflicts: Unfortunately, when you import and export existing projects, naming conflicts between these projects are resolved automatically, renaming the projects. To solve this, you’ll need to rename all the imported repositories and projects upon their completion.
- Interruptions during migration: If the import is interrupted or canceled during migration, the current repo being imported will complete before the migration is canceled. For exports, the migration generally stops immediately and the data becomes corrupted. You can reduce the chances of interruptions by ensuring your source and destination systems are available throughout the migration process.
- Dealing with warnings and errors: Read all “warning” and “error” messages to find and resolve the cause of the issue if any exists. If you’re unable to resolve the errors, you can contact the Atlassian support team for help.
- Performance issues: Using the source or destination instance during imports or exports can cause performance issues. It’s recommended that you run your migration during low-usage periods.
- Initializing processes: If the status of an import job is initializing for an extended period, it’s seen as a fatal error. You should delete all concerned projects and repos before restarting migration.
Backing up data in Bitbucket
Keeping backups of your data is the backbone of data management. Backups protect you against worst-case scenarios like the following:
- When there is a human error like accidental deletion
- When an account is hacked or when account data is corrupted by malware
- When there is catastrophic hardware failure
- When a natural disaster occurs
To ensure the safety of your code and facilitate quick recovery during downtimes, it’s recommended that you back up all your essential project data on Bitbucket. This is because Atlassian restores only its entire platform data and not individual account data.
To automate the Bitbucket data backup process and enable daily and instantaneous backups with minimal effort, Rewind has emerged as a trusted solution for over a hundred thousand organizations worldwide. Rewind Backups for Bitbucket includes a free demo, and it’s available on the Atlassian Marketplace.
How many Bitbucket users are in your organization?
Conclusion
Whether your goal as a developer is to protect against critical data loss, comply with regulations, or migrate to a new versioning system, Bitbucket data import and export is an essential functionality. In this article, you learned all you need to know to independently carry out successful data imports into Bitbucket and exports to your external systems.
Ultimately, you can choose the approach. For instance, you can choose to create a custom pipeline that employs the Bitbucket REST APIs for data migration, or you can choose to use ready-made solutions from Rewind for your Bitbucket repository import and exports. When it comes to your Bitbucket backup needs, Rewind will save you time and resources and guarantee the continuous operation of your business in a worst-case scenario.