
Table of Contents
A company’s project management systems contain a wealth of information. It can be useful to look into past bugs and how they were resolved, provide information about how efficiently teams are working, and shed light on where processes can be improved throughout the organization. If this information is lost, it can adversely affect the organization at all levels. However, when your project management tool is hosted in the cloud, such as with tools like Jira, it can be difficult to control when and how backups are taken. That’s where Jira automated backups come in.
These backups are especially important in the case of infrastructure failure or some other type of service interruption. In addition, it’s always best practice to have more than one copy of your data in case it needs to be integrated into another system or audited for business purposes.
In this article, you’ll take a look at how to implement automated Jira backups so that your data is always accessible when you need it, even in the case of infrastructure failure or another catastrophic incident.
What are Jira Cloud backups?
With a system like Jira, there’s a ton of data moving around. Tasks have a title, description, and comments but can also potentially have attached files, as well as all sorts of other metadata. For a backup to be useful for auditing or restoring after an incident, all of this information needs to be saved and stored as part of the backup. Since you don’t want to spend developer time running these backups—and don’t want to run the risk that someone will forget to run them—they need to be automated. This is where automated Jira backups come in. There are various solutions to creating these backups, including using a premade script hooked up to a cron job, using Jira automations, or using a service like Rewind that specifically offers Jira Cloud backups.
Jira Cloud backups using a script and a cron job
Before starting this, it’s important that you have a Jira cloud account. Since this is the source of the data that’s being backed up, it’s important that you have an account set up with data actually in it. Once you have this, you can start to look at how to automate backups.
Atlassian maintains a repository with backup scripts in various languages. While these are not endorsed by Atlassian or guaranteed to work, they can offer a good starting point when you’re trying to automate your backups. To get these backups running, you need to complete a few steps.
Obtain an Atlassian API key
Because these scripts connect through the Atlassian API, you have to have an Atlassian API key associated with the account you use to log in to Jira Cloud. Atlassian has official documentation on how to obtain an API key for your account that you can take a look at if you’ve never gone through this process before or if you need more information on exactly where this can be found.
Clone the backup script repository
The scripts in the repository are available in Bash, PowerShell, and Python. Depending on the configuration of your system, you’ll need to choose one of these sets of scripts to use. You can clone the entire repository onto your system in your current directory by running the command `git clone git@bitbucket.org:atlassianlabs/automatic-cloud-backup.git`. Then, based on which language you’re using, you can run the backup script. For example, if you are using Python, you might execute the script in the following way:
python
python jira_backup.py -s YOUR_JIRA_URL -u YOUREMAIL@EMAIL.COM -t API_TOKEN -f DESTINATION_DIRECTORY
You’ll notice there are four parameters that have to be passed for the script to work correctly. You would replace the all-caps placeholders in the code sample above with your site or account name (for example, <account>.atlassian.net), the email address for the Jira account with admin rights, your API token (obtained in the previous step), and the directory where you would like the backup to be stored.
Setting a cron job to run the script automatically
At this point, you’re able to run the backup script, which is great. However, manually running it every time you want to take a backup isn’t an ideal situation. To mitigate this, you can set up a cron job to automatically run the command above every week at the same time. You can use a site like crontab guru to help you with the correct syntax, and then create the cron job by editing your crontab file on the server where you are hosting and running the backup script.
Pros and cons
Using scripts to configure your own backups works great if you have programming experience. It’s free, as it uses your existing infrastructure, and it’s relatively straightforward if you have experience in one of the languages the backup scripts are written in. On the other hand, because it’s on infrastructure you own, you’re responsible for patching the backup server, and you have to maintain both the server the script runs on and check for updates of the script itself. In addition, you have to make sure that your server is secure, so as to not leak the Jira credentials stored to use for the script, as well as make sure the backups of your data are secure. It’s also easy for backups to lapse with this option—in many setups, a cron job can fail silently, which would mean that your backups could be failing, and you might not notice until you need them.
The biggest problem with this solution, though, is that it can’t handle restoring your data in the event that something goes wrong. You’d need to manually restore the backup yourself, and if something doesn’t work, you’re on your own. In addition, you will want to make sure that these backup scripts store all the various metadata associated with Jira tickets.
Manual backup scripts are run on your own infrastructure, which means that the time it takes to run a backup not only depends on how much data you have stored in your Jira instance, but also on how powerful your server is. As your project management data continues to grow in Jira, you will need more and more powerful servers to run backups in a reasonable time.
Jira Cloud backups using Jira Automations
In addition to the unofficial backup scripts that Jira provides, automations are also available to help you automate actions in Jira based on the criteria that you set. As with all the solutions in this article, the only prerequisite is that you have a Jira cloud account to use to create the automations. Here’s how you can set up a Jira automation to create a backup.
Create and encode your credentials
First, you need to obtain an Atlassian API key, just as you did in the previous solution. Once you have your API key, you can encode your key, along with the email for your Jira Cloud account, by running the following command in the console:
bash
echo -n "EMAIL@EXAMPLE.COM:API_KEY" | base64
The two all-caps placeholder strings should be replaced with your actual email and API key. After running this command, you’ll see an output string. These are your encoded credentials and will be needed in the next few steps.
Create a Jira Automation backup rule
Now that you have your credentials, you can create your backup rule. To do this, you have to set up a few things:
- Schedule – Every automation rule runs on a schedule specified as a cron expression. If you want to set a more complex schedule, you can, as mentioned previously, use something like crontab guru. For the purposes of this tutorial, though, you can set it to run your backup twice a week by setting the schedule for this job as `0 0 9 ? * 1,4`.
- Action – You have to define the action you want to send. In this case, you want to choose `Send web request`. For the webhook URL, use `*{{baseUrl}}/rest/backup/1/export/runbackup*` where `baseUrl` is the baseUrl of your Jira instance; for the webhook body, use `{“cbAttachments”:”true”, “exportToCloud”:”true”}`. This tells the automation where to look to start the backup and makes sure that any attachments to Jira tickets are included in the backup.
- Action – You can also set up another action to capture the results of the webhook firing. This will let you know if the backup is completed successfully. You can use the `Log action` for this and specify `*{{webhookResponse}}*` in the `Log message` field of the action.
- Save rule – Now, all that’s left is to save the rule and test it using the `Run rule` button. After this, you should see an output of the log file in the Audit log section and be able to download your backup from the Backup Manager section, as well.
Pros and cons
There is definitely less code to be written here than when using automated backup scripts, which is great for someone without a lot of programming experience. In addition, a certain number of automations are free with your Jira account, and it’s fairly easy to set up Jira automations from within the web interface.
On the other hand, you still need some programming knowledge to set up the automation, and like the previous solution, this can’t handle data restoration. Backups are only as good as your ability to restore them, and having to build your own restoration solution can be a pain, especially when you’re dealing with as much metadata as is present in a typical Jira install. In addition, backups are only stored by default for seven days, so if you need to go back further than that, this might not be the best solution for you.
Jira Cloud backups using Rewind
If you don’t want to manage Jira backups yourself, you can use Rewind to manage your backups for you. To get started, you’ll need both a Rewind account and a Jira Cloud account.
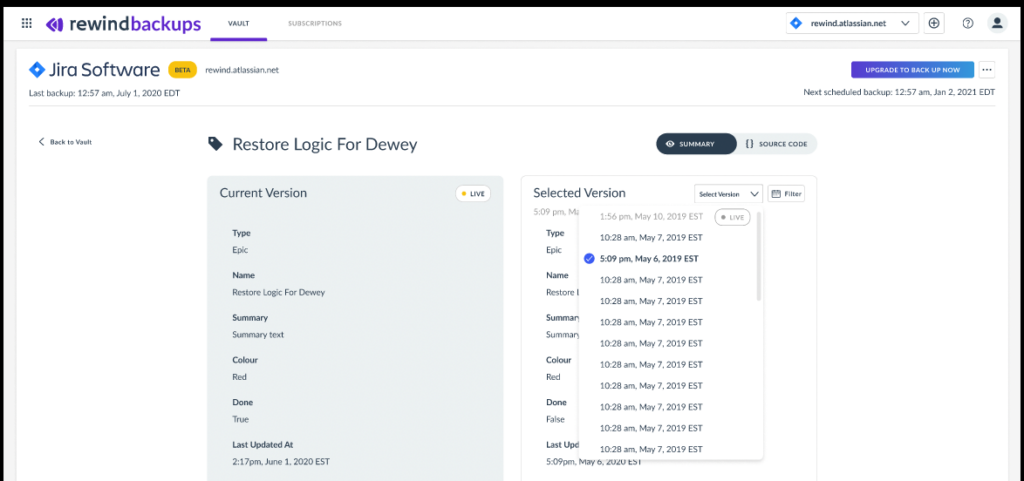
To ensure Rewind has access to your Jira Cloud account, you’ll need to give Rewind access to Jira from within the Rewind dashboard. Once there, you can use Rewind’s no-code platform to set up your automated backups and be sure that your data is managed and secure, as well as ready for automatic restoration when needed. With just a few clicks, you can link your Jira account, configure daily backups, and be able to see past versions of your backups. Unlike the other backup solutions we’ve discussed, Rewind makes restoration as easy as backing up. All it takes is a few clicks and your data’s back where it’s supposed to be, with no complicated scripting needed. Rewind includes backup coverage for Jira Cloud, Jira Service Management, and Jira Work Management.
Pros and cons
This solution is the least programming-intensive of the three, allowing anyone to set up a Jira backup with no code involved. In addition, Rewind gives you granular data restoration, so you can always restore just the data you need. You also get full backup coverage, including a lot of Jira metadata that the other solutions mentioned here don’t capture, and have the ability to restore backups with a few clicks in the user-friendly GUI, which isn’t possible with either of the more DIY solutions.
Using a platform like Rewind to manage your Jira backups is a great choice for most organizations, but it should be noted that the platform isn’t free. However, compared to the engineering time and other costs associated required to set up, run, and maintain the more DIY approaches, it’s probably less than you expect—and being able to easily restore backups in a crisis saves more than just money.

How many Jira Users are in your organization?
* Jira Service Management and Jira Work Management are included in Rewind Backups for Jira Cloud.
Wrapping up
The data in your Jira account is important and not something you want to put at risk if there is any sort of downtime or failure. While there are solutions available for performing DIY backups of your Jira data, they require managing infrastructure or setting up and monitoring automation rules yourself, which might be engineering time you don’t have.
Rewind’s Backups for Jira protects your Jira Cloud instance with automated daily backups and on-demand rapid recovery. Configuring your backups only takes a few minutes, and ensures that your data is always there when you need it. And in the worst-case scenario, you can be confident that you can restore your data from any of your recent backup versions with just a few clicks.
With all your previous versions at your fingertips for painless restoration, you can rest easy knowing all your Jira data is safe with Rewind.
 Sarah Bader">