Rewind is the best backup app for Shopify stores — it’s a bit like Time Machine for Shopify. We use webhooks to enable a feature we call real time backups, which allows us to backup any changes that customers make to some Shopify items (in real time).
One difficulty with handling webhooks is the spikes — with some Shopify Plus customers you may get tens of thousands of webhooks instantly with no notice.
This post talks about the work that we did to split handling webhooks into their own system, and use Amazon EC2 workers to autoscale and process the webhooks.
Original Design
The original design for Rewind was a single, monolithic application. We had a controller that handled webhooks, and processed them in the app.
When a Shopify customer imports new inventory, webhooks for “products/update” are sent for every product. For some of our customers this was tens of thousands of webhooks with no notice.
Here’s what that looked like for our application. You can see the nightly spikes, but for the most part the application was idle.
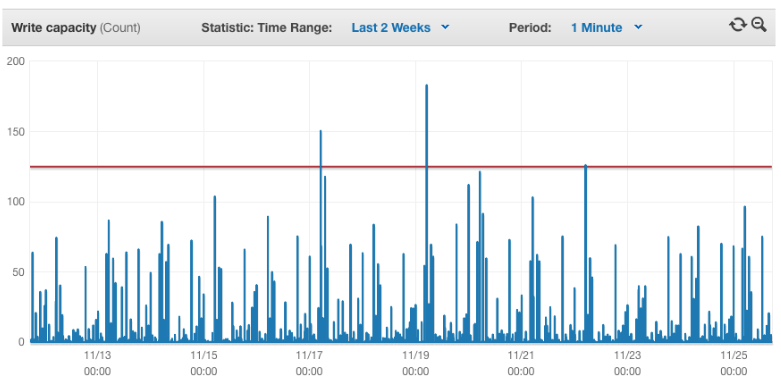
With Shopify, you have to respond with success quickly or the webhooks will be deleted. So our servers needed to be prepared to handle the massive influx of webhooks at any time. The servers we used worked well, but they were large and expensive.
Queueing Responses
After a few months, we decided we needed to move away from this and handle the webhooks differently.
Using a combination of Amazon API Gateway, Amazon Lambda and Amazon Simple Queue Service, we built a system that would receive the webhooks from Shopify and respond instantly. The webhook data would be stored in SQS, and we’d process the data at our own rate.
Amazon Lambda Setup
First we setup our Amazon Lambda function to take the incoming webhook and store it in SQS. Here’s the NodeJS function to do that:
'use strict';
var AWS = require('aws-sdk');
var sqs = new AWS.SQS();
var crypto = require('crypto');
exports.handler = (event, context, callback) => {
  var client_secret = event.client_secret;
  delete event.client_secret;
//calculate the hash
var calculated_hash = crypto.createHmac("sha256", client_secret).update(new Buffer(event.body, "base64")).digest("base64");
//reject the message if the hash doesn't match
if (event["X-Shopify-Hmac-SHA256"] != calculated_hash) {
console.log("calculated_hash: (" + calculated_hash + ") != X-Shopify-Hmac-SHA256: (" + event["X-Shopify-Hmac-SHA256"] + ")");
return;
}
  sqs.getQueueUrl({ QueueName: event.queue }, function(err, data) {
    if (err) {
      console.log('ERR', err);
      return;
    }
var sqsMessageParams = {
 MessageBody: JSON.stringify(event),
 QueueUrl: data.QueueUrl
 };
    sqs.sendMessage(sqsMessageParams, function(err, data) {
      if (err) {
        console.log('ERR', err);
      }
    });
  });
};
Notice that we calculate the hash of the message before storing it in the queue to ensure we don’t pollute the queue with invalid API requests.
Setup Amazon API Gateway
We first created a new model with the following schema:
{
  "$schema": "http://json-schema.org/draft-04/schema#",
  "title": "ShopifyWebhookInput",
  "type": "object",
  "properties": {
    "header": { "type": "string" },
    "body": {
      "type": "string"
    }
  }
}
We then created a new Resource, which had a single “POST” method attached to it.
For the Integration Request, we used the following mapping template:
#set($inputRoot = $input.path('$'))
{
  "X-Shopify-Shop-Domain": "$input.params().header.get('X-Shopify-Shop-Domain')",
  "X-Shopify-Topic": "$input.params().header.get('X-Shopify-Topic')",
  "X-Shopify-Hmac-SHA256": "$input.params().header.get('X-Shopify-Hmac-SHA256')",
  "body": "$util.base64Encode($input.body)",
  "queue": "$stageVariables.sqs_queue",
  "client_secret": "$stageVariables.client_secret"
}
You’ll notice that the queue and client_secret are set in stage variables. We’ll discuss those in a second. The method is set to call our Lambda webhook function, and return 200 to Shopify.
We used stage variables to store the queue name and the client_secret. We have three stages for our API Gateway — development, staging and production. Each stage has two stage variables — sqs_queue and client_secret.
sqs_queue — The name of the SQS queue to send webhook messages to.
client_secret — The client secret of your Shopify API key from your Shopify partners dashboard to validate the Shopify signature before writing to the queue.
We use Route 53 to route these requests to our own domain name, but you can use the URL that AWS provides instead.
Setup Amazon SQS
Setup 3 queues in Shopify corresponding to the 3 stages — development, staging and production. You should setup a dead letter queue to handle any errors to be safe.
Setup AWS Workers
The last step is to setup an Elastic Beanstalk of AWS Workers to process the queue. AWS workers will take the queue and POST the content to localhost. The application needs to be configured to route the requests to the webhook controller. We open sourced our code for this — it’s available on GitHub.
We run our AWS workers on two T2.small load balanced machines, and autoscale them based on the queue size.
Show me the money!
All this has helped us reduce our costs considerably.
Last month this system processed nearly 14 million webhooks. The total cost was $116.49 (or about $0.008 / 1000 webhooks).
How’d we do?
This chart shows the performance of the system in the last 3 days. Just a few spikes, but all were handled very quickly.
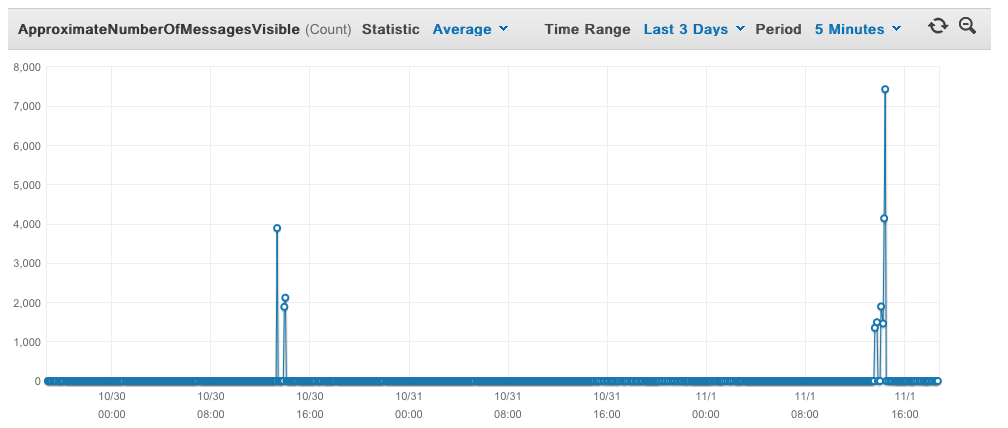
We’re thrilled with the amount we’re saving by having this system process the webhooks, and it scales extremely well. It handles all the incoming requests with hardly any problems, doesn’t cost us much to run, and helps ensure our Shopify backup app runs well.
Visit Rewind on The Shopify App Store
For more information about Rewind, please head on over to rewind.com. Or, learn more about how to backup Shopify, backup BigCommerce, or backup QuickBooks Online.
 Mike Potter">