
Do you ever find yourself starting up your Rails app, walking away to make a coffee, and coming back only to find it still compiling assets? If so – you’re not alone.
A growing issue for today’s Rails developers is the increasingly frustrating asset compilation times that come with more and more front-end heavy web applications. Today we are going to take a dive into the asset compilation process and how to return those precious minutes back into your life so you can return to doing what you do best: slingin’ code.
Webpacker: Your New (Fr)enemy
The jump to utilizing webpacker for compiling your Rails assets in Rails 6 has presented something of a learning curve to those who had grown comfortable with Sprockets – the previous pipeline implementation packaged by default with earlier Rails versions.
With the zeitgeist of modern web development drifting away from backend rendered templating and towards more frontend heavy Javascript driven “web applications”, the switch to a more robust Javascript compilation engine seems like a natural progression for the maturing framework. Unfortunately, as anyone with Javascript experience will tell you, the npm ecosystem has become rather bloated with libraries, frameworks and dependencies – and after all is said and done both the size of your compiled asset, and the actual time it takes to compile them, can choke your development time and resources.
At Rewind, as our app grew, we found the compilation time of the React-heavy frontend an increasingly painful aspect of the development process, as well a major hog of our CI/CD pipeline resources. At some point it grew beyond being a nuisance and became a real problem to be dealt with head on – as opposed to simply tolerated.
Understanding the Compilation Process
One of the greatest joys of Ruby on Rails is how things… just work. Many aspects of the framework simply function out of the box with little or no configuration – a statement which can certainly apply to webpacker. Add a package.json to the root directory, place your own js files in the app/javascripts directory and voila! Assets compile when you start your server and are available throughout your app. So that’s it right? Nothing else to worry about?
The issue with such an easy system is it can be hard to troubleshoot when things don’t go quite as planned – or in our case, hard to optimize when an otherwise automated system doesn’t work as well as is needed. The first step in optimizing this seemingly magic process is pulling back the curtain to see all the moving parts beneath the surface.
The first important distinction to make is the difference between webpack and webpacker:
Webpack is a pure js, standalone tool (completely separate from Ruby/Ruby on Rails) for compiling complex Javascript web applications (such as a React application complete with images, stylesheets, etc) into bundles which can be easily referenced in a plain old HTML page. How the assets are compiled, and how the result bundles are emitted – is configured with a webpack.config.js file.
Webpacker can be thought of as the glue that holds your Webpack compiled js bundles and your Rails application together. A Rails-specific Ruby gem, it’s purpose is twofold – it provides the Rails view helpers for injecting compiled javascript into your application views:

It also acts as a wrapper for the aforementioned webpack compilation tool. Upon installing webpack (or initializing a new Rails 6 app, as it is installed by default) you are presented with several configuration files in your app’s config directory:
webpacker.yml: configures the asset compilation process from the Rails end (which directory holds the assets, what files are to be included, as well as any RAILS_ENV specific settings)
config/webpack: this directory contains webpack specific configuration files. Here you can include any webpack loaders or plugins you wish to include in you webpack compile, and it will generate a neatly wrapped webpack config to be passed on to webpack (replacing the need for a webpack.config.js file). Configurations are separated into environment specific files so the configuration for your asset compilation can be adjusted with the NODE_ENV env variable to select which configuration is used. Interestingly, if you were to – instead of exporting the config object – output it to a file (named webpack.config.js) it can be passed as-is to the standalone webpack executable as a valid configuration file.
Let’s take a look at what tools are at your disposal with webpacker in conjunction with the existing assets pipeline.
Your Webpacker Toolbox
| rake yarn:install |
|
| rake assets:precompile |
|
| rake webpacker:compile |
|
| rake webpacker:clobber |
|
| rake assets:clobber |
|
| bin/webpack | Binstub for the actual webpack executable – this finds webpack within your yarn bin folder and runs it with the generated configuration designated by the NODE_ENV env var |
Determining Your Bottlenecks
So chances are you are reading this because you’re looking to decrease compilation times – do you know what exactly is taking so long though? In a process with many moving parts tucked neatly away it can be difficult to ascertain what it is exactly that’s taking so long. You’ll need to pop that hood and see where the smoke is coming from if you want your engine running smoothly again.
Webpacker comes preloaded with several commonly-used plugins and loaders, some less speedy than others, some of which you may not actually need. The fastest and easiest way we’ve determined to figure out what’s bogging down your times is installing the speed-measure-plugin.
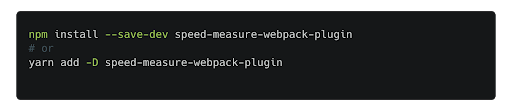
Start by installing the package using your package manager of choice
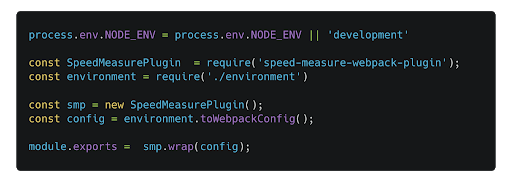
Then “wrap” the generated configuration in your config/webpack environment-specific configuration files:
Next time you compile your assets using webpacker you’ll see something like this:
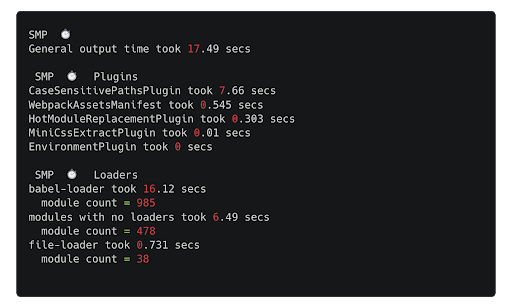
From here you can clearly see any loaders or plugins that may require extra attention – or possibly mandate removal all together if the time they add outweighs their usefulness. We will now discuss how one removes any unnecessary plugins should you find them hogging resources without adding enough value.
Removing Unnecessary Plugins/Loaders
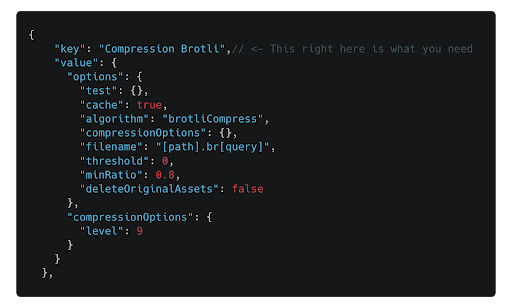
While looking at the files that were being emitted when running webpacker for our production environment we noticed that environment assets were being compressed twice: once using gzip compression and again using Brotli compression. By removing the unnecessary compression plugin we cut the asset compression time in half and well as reduced the total footprint of our assets.
First thing you have to do is determine the internal name, or key, of the plugin/loader you wish to remove. This is, unfortunately, a less than trivial process, as it is not listed anywhere within the Rails app code. This is how we found the key names of webpack plugins: first add this line to config/webpack/environment.js

Recompile your assets – displayed in the output will be a JSON object listing all installed loaders and plugins. We found the plugin we wished to remove sifting through this output and took note of the key value
After finding the name, removing the plugin is simple. Throw this line in whichever environment config you don’t want that plugin/loader to be included in during the compilation process – or in environment.js to remove altogether.

Breaking Up Bloated Webpacks
One of the biggest differences between the traditional asset pipeline and webpacker method is the concept of ‘packs’. Instead of compiling all js files in app/assets and including them with a manifest, all you have to do is place any javascript file you want accessible from your app in app/javascript/packs (or wherever it is configured in config/webpacker.yml) and it will be accessible with an erb view helper such as this one:

This will generate a single <script> tag in your html view, importing the script and any dependencies that script may rely on.
While it is an easy, clean, and reliable solution to importing ES6 web applications into an html page with a single <script> tag, any dependencies relied on by the single js file are packed onboard with it – same with every other packed js file. The price of having a webapp importable through a single js file is that as your npm dependencies grow so does each pack file – requiring an npm library for a single method call means sticking that entire library in that pack file.
There are a couple of implications to this issue:
- the exponentially increasing assets size means potentially longer load times for your website,
- babel transpilation time is significantly longer as the same npm library gets transpiled over and over again for each of your individual packs.
A very cool tool we found called webpack-bundle-analyzer offered an eye-opening visual representation of what each pack in our application consisted of (spoiler alert: mostly node libraries), and just how big they were.
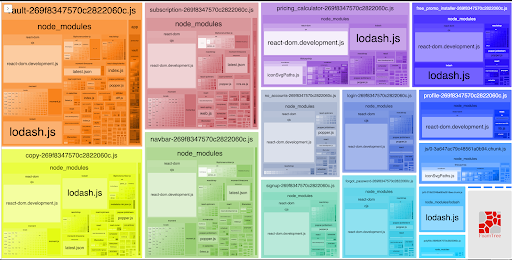
Notice how many webpacks are 90% node_modules? And the majority of these node_modules are the same react/lodash/moment.js packages over and over again. This meant multiple-megabyte sized js packs of the same code being transpiled over and over again.
By using the SplitChunks plugin we were able to split these packs into ‘chunks’ of unique code, often splitting node_module libraries with our own application code into multiple js files – still importable with a single similar erb view helper:

With this one line the pack script is imported, as well as any pack chunks this pack may rely on – the kicker being that multiple independent packs may rely on a single ‘chunk’. The logic of which chunks are relied upon by which pack is neatly handled by Webpacker behind the scenes. To split your bloated packs into neat, bite-sized chunks, just add this one line to your config/webpack/environment.js file:

And replace any javascript_pack_tag calls with javascript_pack_with_chunks_tag in your erb files. That’s it!
Let’s recompile and use webpack-bundle-analyzer to take another look at our packs and what they consist of
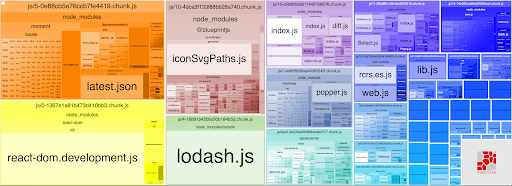
As you can see the ‘chunks’ contain the all third-party code and our actual packs – containing our own application code – have significantly shrunk. The most striking and meaningful change, however, is the lack of duplication within the packs/chunks; every library only ever appears once – a huge boon to asset compilation times.
Multi-threading Expensive Babel Transpiling Operations
If you are still feeling the burn of long compile times it can sometimes be worth looking into multithreading the Babel transpiling process. There is some quite a bit of overhead here though, so it’s only recommended in certain cases where Babel is taking an egregiously long time; in our case the overhead wasn’t worth the benefit it brought, though it’s worth mentioning in case your situation differs.
Details on thread-loader can be found here.
Conclusion
Waiting sucks. Very few people enjoy waiting for stuff to compile – possibly even none. If you find yourself frustrated with the asset compilation time of your Rails app it can definitely be worth seeing what can be optimized – or even removed. Taking a day to clean up your asset compilation process can save you and your team cumulative hours of waiting around doing literally nothing.
Have you discovered ways to optimize your Rails app’s compilation process? Tell us what you did to cut asset compile time in the comments below, or shoot us a tweet perhaps.
Interested in solving problems like this? Want to get paid at the same time?? Check out Rewind’s open positions to start your career in DevOps, Security, Engineering, and more.
 Jason Meredith">