Git has become an essential part of version control and collaboration in software development. Git and platforms like Bitbucket are essential for teams looking to increase their workflow efficiency and accuracy. These tools allow developers to collaborate and integrate seamlessly, making it easier for teams to stay organized and on track.
However, although these tools offer many useful features, there is still a risk of accidentally deleting a branch that can put a project at risk. The deleted branch could contain critical data not present elsewhere, and mitigating the data loss can cause a lot of churn. For example, a branch could contain signing configurations, release metadata, or sensitive information not backed up elsewhere. If an application’s release build depends on this data, the accidental deletion of such a branch could block future releases.
Atlassian’s Terms of Service (TOS) clause 5.2 highlights that they “assume no responsibility or liability for Your Data, and you are solely responsible for Your Data.” On the other hand, in a shared responsibility model, the Software as a Service (SaaS) provider and the user share responsibility for the data.
In this article, you’ll learn how to restore deleted branches in Bitbucket and how to avoid accidental deletion.
Restoring Deleted Branches in Atlassian Bitbucket
There could be scenarios where a branch you are working on accidentally gets deleted and its backup is not available remotely on Bitbucket. While using the CLI or GUI, it is easy to unintentionally delete the wrong branch by clicking the wrong option or mistyping. CLI doesn’t prompt for a confirmation while trying to delete the branch, and similarly, depending on the GUI you are using, it might delete the branch without a confirmation. For example, if you are working on a new feature branch that has not yet been pushed to Bitbucket, accidental deletion might cause a loss of days’ worth of work.
In the following tutorial, you’ll first create a sample repository and add a branch with some commits. You’ll then delete the branch and learn some ways to recover.
Creating a Repository and Deleting a Branch
To replicate accidental branch deletion, you need to first create a sample repository, create commits to the main branch, create a new branch, create commits to the new branch, and finally delete the branch. In this section, you’ll go through each of these steps.
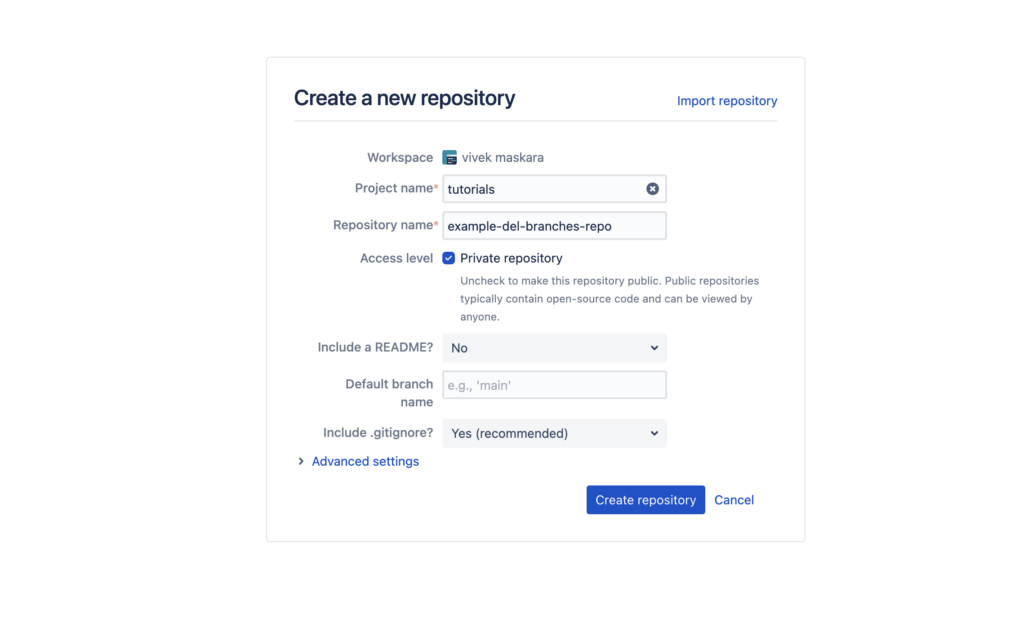
Create a Bitbucket repository from its dashboard. Fill out the project and repository names and click Create repository to create an empty repository.
To clone the repository locally, click Clone on the repository page and copy the SSH URL to clone it by executing the following command:
git clone git@bitbucket.org:maskaravivek/example-del-branches-repo.git

cd example-del-branches-repo

echo "Journal Day 1" > day_1_journal.txt

git add .

git commit -m "Add Day 1 Journal"
Note: Make sure to replace the SSH URL in the command with your repository’s URL.
Next, you need to create a few commits on the master branch. Create the first commit on the master branch by executing the following commands:
You should get an output similar to the following:
[master 0a0066b] Add Day 1 Journal
1 file changed, 1 insertion (+)
create mode 100644 day_1_journal.txt
Similarly, you can create a few more commits on the master branch:
echo "Journal - Day 2: My thoughts" >> day_2_journal.txt
git add .
git commit -m "Add Day 2 Journal"

echo "Journal - Day 3: My thoughts" >> day_3_journal.txt
git add .
git commit -m "Add Day 3 Journal"
You’ve now added a few commits to master and can use the following command to push the branch to Bitbucket:
git push origin master
Next, you’ll create a new branch and make a few commits to it. Create a new branch named journal-weekly-summary and check out the branch by executing the following command:
git checkout -b journal-weekly-summary
Use the next commands to add a commit to the new branch:
echo "Journal - Week 1: My thoughts for the week" >> week_1_journal.txt
git add .
git commit -m "Add Week 1 Journal"
It will commit your changes to the journal-weekly-summary branch. The output of the commands is shown below:
[journal-weekly-summary 855f341] Add Week 1 Journal
1 file changed, 1 insertion(+)
create mode 100644 week_1_journal.txt
Add some commits to the journal-weekly-summary branch with the following commands:
echo "Week 1 thoughts" > week_1_journal.txt
git add .
git commit -m "Week 1 Journal updated"

echo "Added more thoughts to the journal" >> week_1_journal.txt
git add .
git commit -m "Week 1 Journal updated with more thoughts"
The output of the commands will look something like this:
--output for first commit--
[journal-weekly-summary a7b6699] Week 1 Journal updated
1 file changed, 1 insertion(+), 1 deletion(-)

--output for second commit--
[journal-weekly-summary bee734e] Week 1 Journal updated with more thoughts
1 file changed, 1 insertion(+)
You’ve made a few commits to journal-weekly-summary, which is not synced with Bitbucket. If the local copy of the branch is accidentally deleted at this point, you will be unable to restore it from Bitbucket. To demonstrate techniques for restoring deleted branches, let’s delete the unsynced branch:
git checkout master
git branch -D journal-weekly-summary
The output of the command would look similar to this:
Deleted branch journal-weekly-summary (was bee734e).
Notice that the output includes a SHA (*ie* bee734e). The SHA refers to the hash of the last commit for the journal-weekly-summary branch. Keep it handy as you’ll need it in later sections.
Restoring the Deleted Branch
If a branch is accidentally deleted, you can check if the branch data exists in one of the other repository clones. You can push the branch from a repository copy that retains the branch data if available. You could also check existing backups of the repository directory and attempt restoration using it. If the branch data is absent in a backup or a different cloned copy, you must try manually restoring using the checkout command. To restore a deleted branch, you can use the checkout command to restore it to the latest commit:
git checkout -b <branch-name> <sha>
The above command needs the following substitutions:
<branch-name>with the name of the restored branch<sha>with the hash of the last commit for that branch
As you can see, you’ll need to find the last commit’s hash for the deleted branch if you want to restore it. Since the branch is already deleted, finding the hash can be challenging, but there are a few different methods:
Recently Deleted Branch
When you delete a branch, as you saw in a previous section, the output includes the hash of the last commit on that branch. You can simply use the SHA to restore the branch by executing the following command:
git checkout -b journal-weekly-summary bee734e
Restoring a branch is relatively simple if you have the deleted operation’s output handy, but you might not always be lucky.
From Remote
The branch may still be on the upstream Git repository (ie Bitbucket). You can list the branches on the upstream Git repository by executing the following command:
git branch -r
It outputs the list of remote branches, as shown below:
origin/HEAD -> origin/master
origin/journal-weekly-summary
origin/master
If the branch you want to restore is present upstream, you can use the git rev-parse command to get the hash of the last commit on that branch.
git rev-parse origin/journal-weekly-summary
It will output the hash of the HEAD commit, as shown below:
bee734e16f38f861844cdc47f33e1f40f24e4b9b
You can use the commit hash to restore the branch as follows:
git checkout -b journal-weekly-summary
bee734e16f38f861844cdc47f33e1f40f24e4b9b
Note: If the journal-weekly-summary branch was never pushed to Bitbucket, the command will not list it, and you won’t be able to use this approach for restoration.
Dangling Commit
You can use the git fsck command to find commits that are not associated with any branches. The journal-weekly-summary contained three commits, which you should be able to find dangling after the branch was deleted. You can run the following command to find dangling commits in a repository:
git fsck --lost-found
Executing the fsck command will produce an output similar to this:
Checking object directories: 100% (256/256), done.
Checking objects: 100% (3/3), done.
dangling commit 2e21eafce77b2b36c08274797860fc1181c68607
dangling commit 3153e43f0ee9b5eabdae2a2b3c53fe1c15c24ec3
dangling commit bee734e16f38f861844cdc47f33e1f40f24e4b9b
For each of the dangling commits, you can execute the git cat-file command to verify the details of the commit. For example, execute the following command to check the commit details and verify whether it was the most recent commit on the deleted branch:
git cat-file -p bee734e16f38f861844cdc47f33e1f40f24e4b9b
The command outputs the details of the commit, as shown below.
tree 443017941c05baac1ec05ae20ea4a9e04277008dparent a7b6699277c187567cbd59383fa09f9023002f3a
author Vivek Kumar Maskara <maskaravivek@gmail.com> 1702430073 -0500
committer Vivek Kumar Maskara <maskaravivek@gmail.com> 1702430073 -0500
Week 1 Journal updated with more thoughts
Once you find the correct commit hash, you can use it to restore the branch by executing the following command:
git checkout -b journal-weekly-summary
bee734e16f38f861844cdc47f33e1f40f24e4b9b
git reflog
Git stores the reference logs (reflogs) at the tip of the branches whenever they are updated in the local repository. By default, the git reflog command outputs the reflog of the HEAD ref. HEAD is a symbolic reference to the currently active branch. If you know the name of the deleted branch, you can use `git reflog` to find the last reference to the deleted branch by executing the following command:
git reflog --no-abbrev | grep journal-weekly-summary
The command outputs the references of the journal-weekly-summary, as shown below.
e396673f361aa876f5931b65fd5174949cd03788 HEAD@{0}: checkout: moving from journal-weekly-summary to master
bee734e16f38f861844cdc47f33e1f40f24e4b9b HEAD@{1}: checkout: moving from master to journal-weekly-summary
e396673f361aa876f5931b65fd5174949cd03788 HEAD@{2}: checkout: moving from journal-weekly-summary to master
--output omitted--
Notice that the second line of the output shows the hash of the commit when you moved from master to journal-weekly-summary. This is the hash you’re interested in as it refers to the HEAD ref of the current branch (journal-weekly-summary) at that point. You can use the commit hash to restore the branch as follows:
git checkout -b journal-weekly-summary
bee734e16f38f861844cdc47f33e1f40f24e4b9b
This guide provides more details on using `git reflog` to restore deleted branches.
As you saw, there are multiple techniques to obtain the latest commit hash for restoring a branch, but if the reference logs or hashes have expired or been erased, it may not be possible to recover the deleted branch. The permanent deletion of a branch could result in the loss of days or months of valuable work, posing a significant challenge in recreating the content. The situation becomes even more critical if the branch contains essential elements like API keys, signing configurations, or sensitive information without backup elsewhere. This loss could potentially block upcoming releases until the keys or configurations are successfully restored.
However, you don’t have to worry about losing important data if you set up an automated backup system like Rewind. Rewind takes regular backups of your Bitbucket repositories, so if you accidentally delete something, you can quickly restore it to its original form with all associated metadata.
Manual handling of exported backup files could quickly become unmanageable, messy, and expensive to store. Rewind provides secure storage for all backups and metadata, so you don’t have to worry about where to store your exported workflow files.
Preventing Users from Accidentally Deleting Branches in Bitbucket
As a software developer, you can also take some measures to prevent accidentally deleting branches in Bitbucket:
- Limiting permissions: On Bitbucket, you can set fine-grained permissions at the [workspace](https://support.atlassian.com/bitbucket-cloud/docs/grant-access-to-a-workspace/) and [repository](https://confluence.atlassian.com/bitbucketserver/using-project-permissions-776639801.html) levels to ensure that only authorized individuals have the ability to perform dangerous actions like deleting a branch. By defining and adhering to a permissions hierarchy, you can significantly mitigate the risk of inadvertent branch removal.
- Backups: Solely relying on Bitbucket’s version control features does not provide comprehensive backup for your repository. Taking frequent backups of your repository significantly reduces the risk of data loss, but manual backups can soon become unmanageable. Rewind is a specialized backup solution designed to work seamlessly with Bitbucket, enabling faster and easier backup and recovery. In previous sections, you saw how to restore deleted branches manually, but with Rewind, you can simply log in to the [Rewind](https://rewind.com/) dashboard and initiate a restore.
- User education: Educating the team on the potential consequences of accidentally deleting a branch and the importance of following permission protocols helps build resilience. To give the team a sense of security, you could promote the use of backup applications like Rewind. With the help of a reliable backup application, team members can approach their work with more confidence as they know that if they make a mistake, the repository can be quickly returned to its original state.
Conclusion
In this tutorial, you learned how to restore a deleted Bitbucket branch using the hash of the latest commit on the deleted branch. You also learned about some measures to prevent users from accidentally deleting branches in Bitbucket. A combination of permission management, a dependable backup strategy, and user education will likely reduce any accidental branch deletions.
Back up your Bitbucket with Rewind. Prevent deleted branches from permanently affecting your workflow with a third-party backup and recovery tool.